【第六期论文复现赛-语义分割】DDRNet

本文介绍DDRNet语义分割模型,其属双路径结构,含高低分辨率两个分支,分别保存细节与提取上下文信息,通过Bilateral fusion模块融合特征,引入DAPPM模块和辅助损失。复现的DDRNet - 23在Cityscapes验证集mIoU达79.85%,优于目标值,已被paddleseg收录。

【第六期论文复现赛-语义分割】Deep Dual-resolution Networks for Real-time and Accurate Semantic Segmentation of Road Scenes
paper:Deep Dual-resolution Networks for Real-time and Accurate Semantic Segmentation of Road Scenes
github:https://github.com/ydhongHIT/DDRNet
复现地址:https://github.com/justld/DDRNet_paddle
轻量级语义分割模型大致分为2类:Encoder-Decoder结构(如ESPNet)和two-pathway(如BiSeNet)。类似two-pathway结构,DDRNet使用Dual-resolution,并引入DAPPM( Deep Aggregation Pyramid Pooling Module)模块。在Cityscapes测试集、GPU 2080Ti,DDRNet-23-slim达到102FPS,miou77.4%。本项目复现了DDRNet_23,在cityscapes val miou 为79.85%,该算法已被paddleseg收录。
模型预测效果(来自cityscapes val):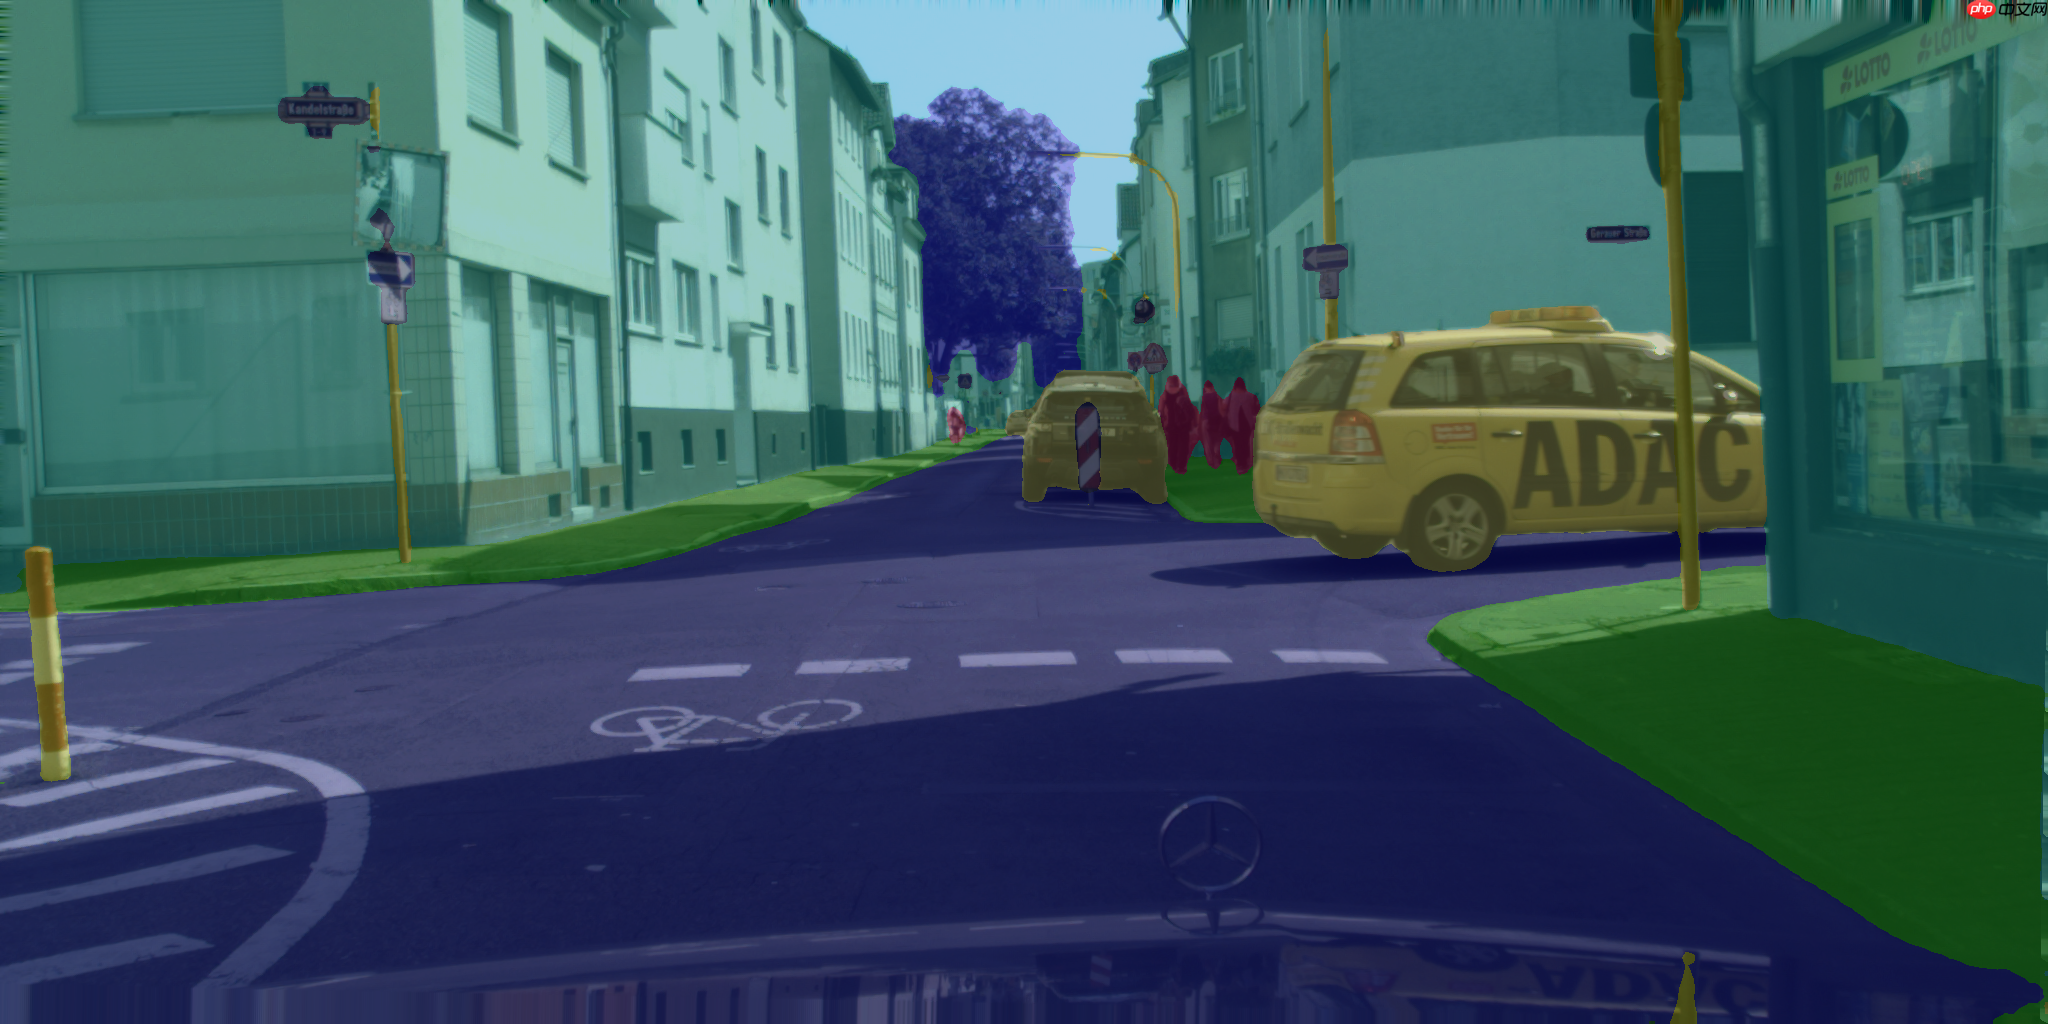
一、几种语义分割模型结构
下图为语义分割模型的几种结构:
(a)空洞卷积:通过空洞卷积增加模型的感受野,保留高分辨率的特征图降低信息损失;(Deeplab系列)
(b)Encoder-Decoder:通过Encoder(backbone)提取不同分辨率的特征图,然后将不同分辨率的特征图上采样融合,可以通过更换backbone来控制模型的大小;(UNet、ESPNet)
(c)Two-pathway:模型包含2个path,一个path负责提取上下文语义信息,一个path保留细节信息,然后将2个path输出融合。(BiSeNetV1、V2)
(d)DDRNet结构,具体见下文。
二、网络结构
DDRNet网络结构如下图所示,模型包含2个分支,上面的分支分辨率较高,保存细节信息,下面的分支分辨率较低,用来提取上下文信息(使用了DAPPM模块增加其感受野),分支间特征融合使用Bilateral fusion模块,另外引入辅助损失函数。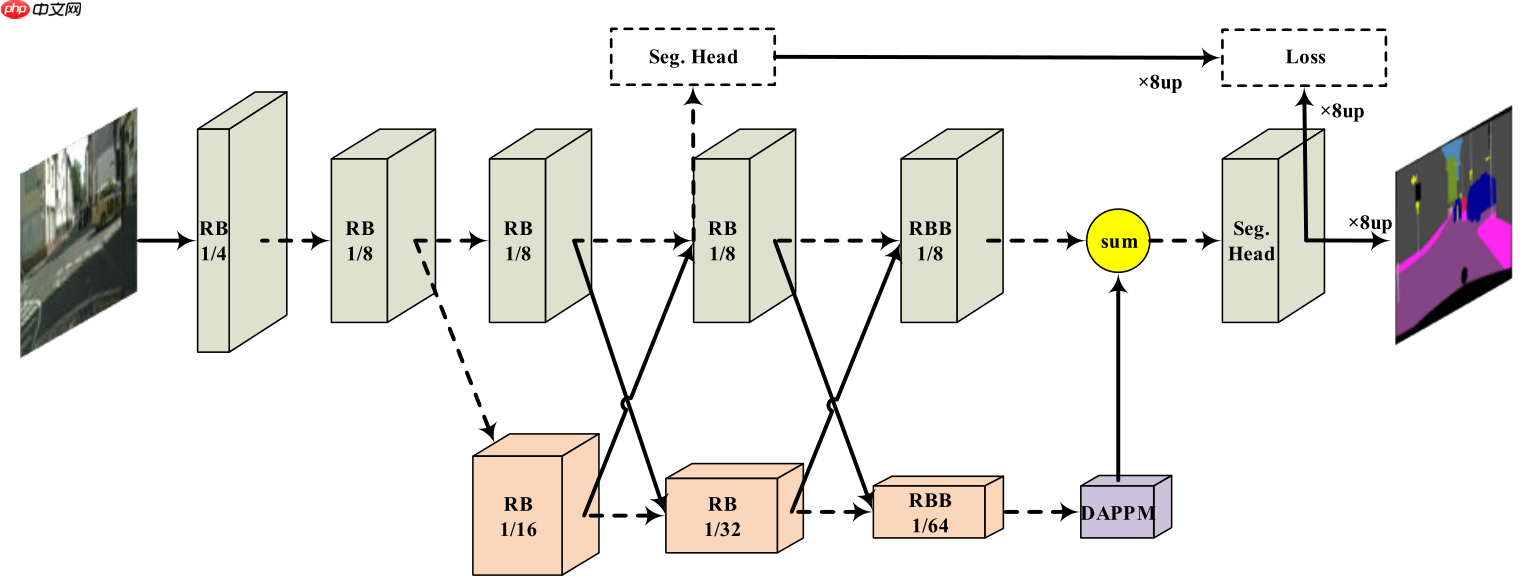
三、Bilateral fusion
DDRNet为了结合不同分辨率的特征图,使用了Bilateral fusion模块,不同分支不同分辨率的特征图分别通过上采样下采样后相加,保持自身分辨率不变的同时融合了另一分支的信息。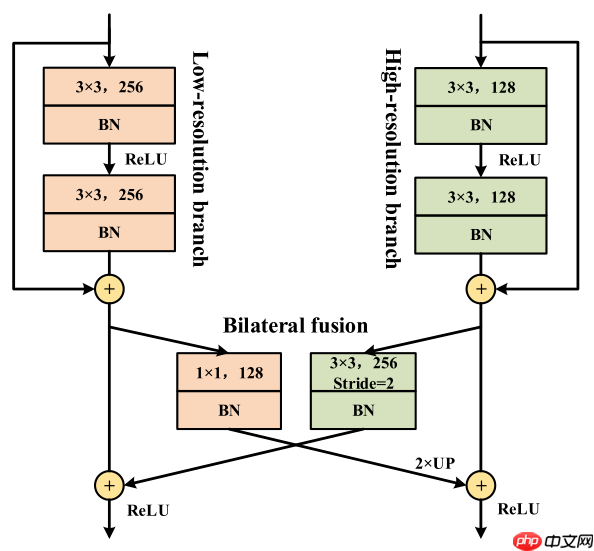
四、 Deep Aggregation Pyramid Pooling Module(DAPPM)
DAPPM为了获得多尺度信息,对输入特征图进行池化(核大小和步长不同),然后将不同大小的特征图上采样融合。
PS:池化部分类似PSPNet提出的Pyramid Pooling Module,整体结构类似ESPNetV2提出的EESP模块,具体可参考相关论文。 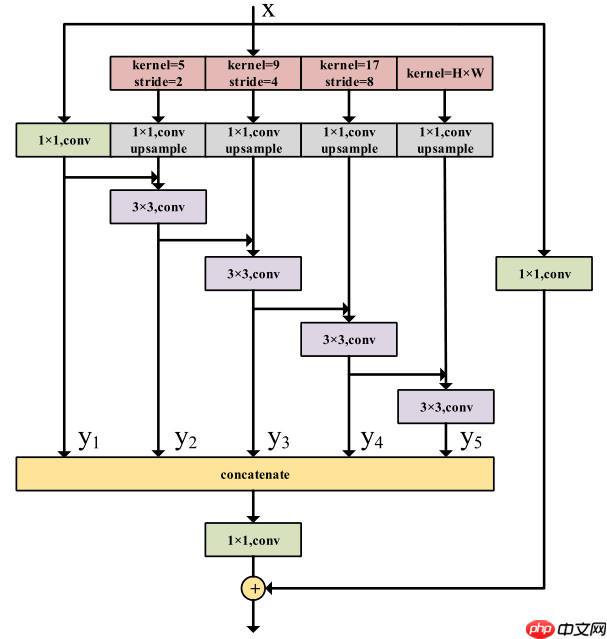
pytorch源码:
class DAPPM(nn.Module): def __init__(self, inplanes, branch_planes, outplanes): super(DAPPM, self).__init__() self.scale1 = nn.Sequential(nn.AvgPool2d(kernel_size=5, stride=2, padding=2), BatchNorm2d(inplanes, momentum=bn_mom), nn.ReLU(inplace=True), nn.Conv2d(inplanes, branch_planes, kernel_size=1, bias=False), ) self.scale2 = nn.Sequential(nn.AvgPool2d(kernel_size=9, stride=4, padding=4), BatchNorm2d(inplanes, momentum=bn_mom), nn.ReLU(inplace=True), nn.Conv2d(inplanes, branch_planes, kernel_size=1, bias=False), ) self.scale3 = nn.Sequential(nn.AvgPool2d(kernel_size=17, stride=8, padding=8), BatchNorm2d(inplanes, momentum=bn_mom), nn.ReLU(inplace=True), nn.Conv2d(inplanes, branch_planes, kernel_size=1, bias=False), ) self.scale4 = nn.Sequential(nn.AdaptiveAvgPool2d((1, 1)), BatchNorm2d(inplanes, momentum=bn_mom), nn.ReLU(inplace=True), nn.Conv2d(inplanes, branch_planes, kernel_size=1, bias=False), ) self.scale0 = nn.Sequential( BatchNorm2d(inplanes, momentum=bn_mom), nn.ReLU(inplace=True), nn.Conv2d(inplanes, branch_planes, kernel_size=1, bias=False), ) self.process1 = nn.Sequential( BatchNorm2d(branch_planes, momentum=bn_mom), nn.ReLU(inplace=True), nn.Conv2d(branch_planes, branch_planes, kernel_size=3, padding=1, bias=False), ) self.process2 = nn.Sequential( BatchNorm2d(branch_planes, momentum=bn_mom), nn.ReLU(inplace=True), nn.Conv2d(branch_planes, branch_planes, kernel_size=3, padding=1, bias=False), ) self.process3 = nn.Sequential( BatchNorm2d(branch_planes, momentum=bn_mom), nn.ReLU(inplace=True), nn.Conv2d(branch_planes, branch_planes, kernel_size=3, padding=1, bias=False), ) self.process4 = nn.Sequential( BatchNorm2d(branch_planes, momentum=bn_mom), nn.ReLU(inplace=True), nn.Conv2d(branch_planes, branch_planes, kernel_size=3, padding=1, bias=False), ) self.compression = nn.Sequential( BatchNorm2d(branch_planes * 5, momentum=bn_mom), nn.ReLU(inplace=True), nn.Conv2d(branch_planes * 5, outplanes, kernel_size=1, bias=False), ) self.shortcut = nn.Sequential( BatchNorm2d(inplanes, momentum=bn_mom), nn.ReLU(inplace=True), nn.Conv2d(inplanes, outplanes, kernel_size=1, bias=False), ) def forward(self, x): #x = self.downsample(x) width = x.shape[-1] height = x.shape[-2] x_list = [] x_list.append(self.scale0(x)) x_list.append(self.process1((F.interpolate(self.scale1(x), size=[height, width], mode='bilinear')+x_list[0]))) x_list.append((self.process2((F.interpolate(self.scale2(x), size=[height, width], mode='bilinear')+x_list[1])))) x_list.append(self.process3((F.interpolate(self.scale3(x), size=[height, width], mode='bilinear')+x_list[2]))) x_list.append(self.process4((F.interpolate(self.scale4(x), size=[height, width], mode='bilinear')+x_list[3]))) out = self.compression(torch.cat(x_list, 1)) + self.shortcut(x) return out登录后复制
五、实验结果
cityscapes在cityscapes验证集和测试集上的表现如下: 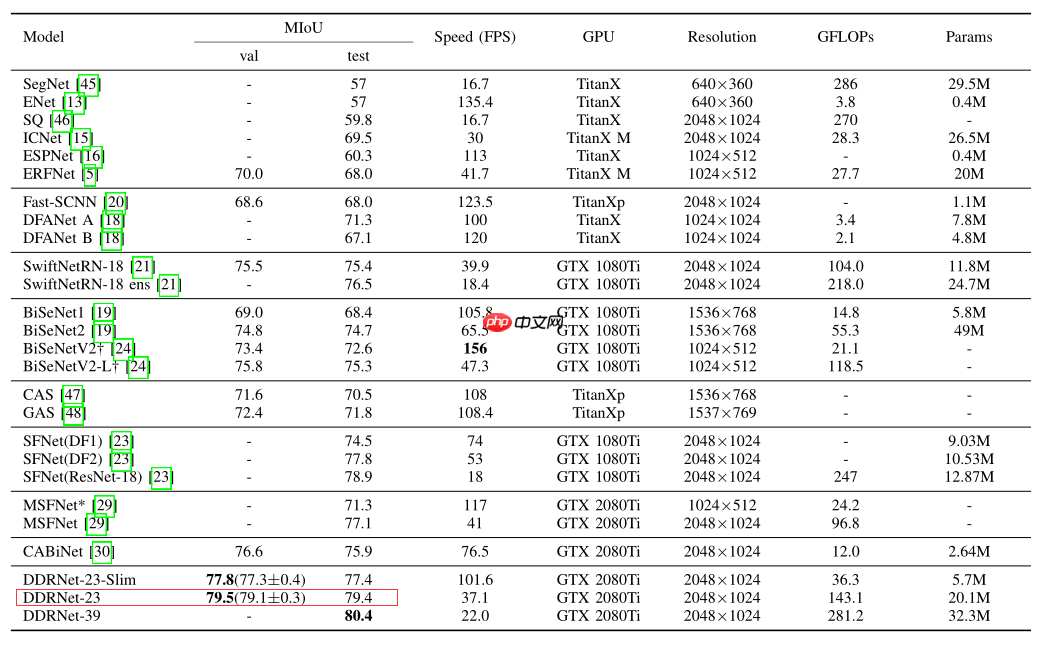
六、复现结果
本次复现的目标是DDRNet-23 在cityscapes验证集 mIOU= 79.5%,复现的miou为79.85%。详情见下表:
七、快速体验
运行以下cell,快速体验DDRNet-23。
In [ ]# step 1: unzip data%cd ~/PaddleSeg/!mkdir data!tar -xf ~/data/data64550/cityscapes.tar -C data/%cd ~/登录后复制 In [ ]
# step 2: 训练%cd ~/PaddleSeg!python train.py --config configs/ddrnet/ddrnet23_cityscapes_1024x1024_120k.yml \ --do_eval --use_vdl --log_iter 100 --save_interval 4000 --save_dir output登录后复制 In [ ]
# step 3: val%cd ~/PaddleSeg/!python val.py \ --config configs/ddrnet/ddrnet23_cityscapes_1024x1024_120k.yml \ --model_path output/best_model/model.pdparams登录后复制 In [ ]
# step 4: val flip%cd ~/PaddleSeg/!python val.py \ --config configs/ddrnet/ddrnet23_cityscapes_1024x1024_120k.yml \ --model_path output/best_model/model.pdparams \ --aug_eval \ --flip_horizontal登录后复制 In [ ]
# step 5: val ms flip %cd ~/PaddleSeg/!python val.py \ --config configs/ddrnet/ddrnet23_cityscapes_1024x1024_120k.yml \ --model_path output/best_model/model.pdparams \ --aug_eval \ --scales 0.75 1.0 1.25 \ --flip_horizontal登录后复制 In [ ]
# step 6: 预测, 预测结果在~/PaddleSeg/output/result文件夹内%cd ~/PaddleSeg/!python predict.py \ --config configs/ddrnet/ddrnet23_cityscapes_1024x1024_120k.yml \ --model_path output/best_model/model.pdparams \ --image_path data/cityscapes/leftImg8bit/val/frankfurt/frankfurt_000000_000294_leftImg8bit.png \ --save_dir output/result登录后复制 In [ ]
# step 7: export%cd ~/PaddleSeg!python export.py \ --config configs/ddrnet/ddrnet23_cityscapes_1024x1024_120k.yml \ --model_path output/best_model/model.pdparams \ --save_dir output登录后复制 In [ ]
# test tipc 1: prepare data%cd ~/PaddleSeg/!bash test_tipc/prepare.sh ./test_tipc/configs/ddrnet/train_infer_python.txt 'lite_train_lite_infer'登录后复制 In [ ]
# test tipc 2: pip install%cd ~/PaddleSeg/test_tipc/!pip install -r requirements.txt登录后复制 In [ ]
# test tipc 3: 安装auto_log%cd ~/!git clone https://github.com/LDOUBLEV/AutoLog %cd AutoLog/!pip3 install -r requirements.txt!python3 setup.py bdist_wheel!pip3 install ./dist/auto_log-1.2.0-py3-none-any.whl登录后复制 In [ ]
# test tipc 4: test train inference%cd ~/PaddleSeg/!bash test_tipc/test_train_inference_python.sh ./test_tipc/configs/ddrnet/train_infer_python.txt 'lite_train_lite_infer'登录后复制
免责声明
游乐网为非赢利性网站,所展示的游戏/软件/文章内容均来自于互联网或第三方用户上传分享,版权归原作者所有,本站不承担相应法律责任。如您发现有涉嫌抄袭侵权的内容,请联系youleyoucom@outlook.com。
同类文章
华为ACT三步计划:助力行业智能化转型实践指南
随着人工智能技术的迅猛发展,大模型迭代速度不断加快,但多数行业在智能化转型过程中,仍面临技术从实验室走向生产线的巨大挑战。如何让AI真正融入核心生产场景,成为企业关注的焦点。从商业价值体现到专有数据
阿里云AI大模型革新操作系统与计算未来
阿里巴巴集团近期因AI业务表现强劲,股价迎来显著上涨。9月1日财报发布后,其港股股价单日涨幅达18 5%,收于137 1港元 股,市值突破2 6万亿港元。随后在9月24日云栖大会召开当日,股价再度攀
自贡成立1.6亿数投机器人公司 专注AI领域投资
近日,一家名为自贡数投机器人产业投资有限公司的新企业在工商部门完成注册登记,正式宣告成立。据公开信息显示,该公司法定代表人为魏愚,注册资本达1 6亿元人民币,展现出雄厚的资金实力。该公司的经营范围十
阿里云生态转型:构建AI落地协同通道
一年一度的云栖大会再度成为科技界的焦点。与往届不同,今年的大会上,阿里云将舞台中央让给了与其合作的生态伙伴,展现出云产业在AI时代的新趋势。在云市场的“超级市集”展区,各类基于AI技术的具体应用成为
国产垂类AI如何突破?谷歌"香蕉"爆火启示
最近,一根香蕉打破了AI圈的平静。 最初可能只是朋友圈病毒式传播的手办图,但随后事情似乎向着疯狂的方向发展,上线不到两周,谷歌旗下的Nano Banana已在全球生产超2亿张图片,亚太地区用户热情
相关攻略
热门教程
更多- 游戏攻略
- 安卓教程
- 苹果教程
- 电脑教程


