




Ghostty终端真实使用体验深度评测

Ghostty采用GPU加速渲染和Kitty协议,在AI编程工具流式输出大量文本时无卡顿闪烁,内存占用稳定。iTerm2因CPU渲染在高频刷新场景下存在撕裂、残影等问题,且与ClaudeCode等工具存在兼容冲突。Ghostty更轻量,适合承载CLI形态的AI工具。
想想最开始接触开发的时候,iTerm2 几乎是必装的工具之一。这倒也没什么特别的原因——用的人多,生态完善,找主题、配插件都方便。但自从开始深度使用 AI 编程助手(也就是 Coding Agent),在终端上花的时间肉眼可见地增多,iTerm2 在大量文本输出时的卡顿和闪烁问题就开始让人有点坐不住了。正因如此,Claude 推荐的 Ghostty 进入了视野。花了个把小时配置好,实际体验了一段时间后,确实感受到了明显的提升。
为什么选择 Ghostty
| 特性 | 说明 |
| GPU加速渲染 | Zig编写,极低资源占用,渲染丝滑 |
| 原生Kitty协议 | 支持图片显示、富文本、高级shell集成 |
| 快速终端 | 全局快捷键呼出下拉终端,不离开当前窗口 |
| 超大回滚 | 支持千万级行数,AI工具长输出不再丢失 |
这是官方给出的核心特性。简单来说,它就是更轻量、不泄露内存、渲染不卡顿的存在,天然适合承载 Claude Code、Codex、OpenCode 这类 CLI 形态的 AI 工具。
Ghostty vs iTerm2
那问题来了:如果一直用着 iTerm2,有必要换吗?可以从三个维度来看:架构差异、普通开发场景、AI 开发场景。
1、架构差异
| 维度 | iTerm2 | Ghostty |
| 语言 | Objective-C | Zig |
| 渲染方式 | CPU渲染 (Core Graphics) | GPU渲染 (Metal on macOS) |
| UI 框架 | 自绘控件 | 原生系统控件 (AppKit) |
| 终端协议 | xterm兼容 + 私有扩展 | Kitty协议 + xterm兼容 |
核心变量就是渲染方式。iTerm2 靠 CPU 逐帧绘制,Ghostty 则用 Metal GPU 批量处理。当终端内容高速刷新——比如 AI 工具流式输出成片的代码和日志——Ghostty 的 GPU 可以一次性完成整个屏幕的合成,而 iTerm2 的 CPU 渲染要逐帧更新,中间帧多了,闪和卡也就来了。
2、普通程序开发
日常敲命令、写代码(vim/nano/git):提升不算大。
说实话,如果你只是跑跑 git、npm、ls,写几行 shell 脚本,iTerm2 完全够用。CPU 渲染在低频刷新场景下,跟 GPU 渲染的体感差异几乎可以忽略。不过下面这几个场景,差别就明显了:
| 场景 | iTerm2 | Ghostty | 体感差异 |
| 快速滚动大量日志 | 偶尔撕裂、掉帧 | 同步渲染,无撕裂 | 明显 |
| 长时间使用(>4h) | 内存缓慢增长 | 内存稳定 | 中等 |
| Neovim + LSP高频刷新 | 快速补全弹窗偶有残影 | 流畅无残影 | 明显 |
| 全屏TUI工具(htop/lazygit) | 可用,偶有闪烁 | 丝滑 | 轻微 |
| 多标签/多分屏 | 标签多了会卡 | 标签切换流畅 | 中等 |
3、AI编程开发
Claude Code 的 GitHub Issues 里,关于 iTerm2 的渲染问题可不是个别现象。这里整理了一部分比较有代表性的:
| Issue | 问题 |
| #72392 | Flicker-free 渲染破坏了 iTerm2 上的 Shift+Enter |
| #56546 | 全屏 TUI 模式滚动卡顿/不流畅 |
| #56275 | 对话历史滚动时输入框渲染错误、布局破损 |
| #52436 | 启用 NO_FLICKER 后 Ctrl-G 编辑器输出原始键码 |
| #51576 | 终端 UI 中间出现重复的对话输出行 |
| #44492 | CLAUDE_CODE_NO_FLICKER=1 导致 /resume 无法完整预览 |
| #34765 | 处理过程中滚动位置重置到会话顶部 |
为了缓解闪烁,Claude Code 曾经专门推出了环境变量 CLAUDE_CODE_NO_FLICKER=1。但这个开关本身在 iTerm2 里就会引入新问题——Shift+Enter失效、编辑器冻结,都属于兼容性冲突的表现。这说明 Claude Code 的 TUI 渲染引擎,跟 iTerm2 的终端协议实现天然不对付。
那为什么 Ghostty 不会有这些问题?
- 同步渲染:Ghostty 支持 Kitty 协议的同步渲染特性,Claude Code 的流式输出在 GPU 侧完成合成后才刷新屏幕,根本不存在闪烁的前提条件。iTerm2 不支持此特性。
- Kitty 键盘协议:Claude Code 用了大量快捷键(Shift+Tab、Ctrl+O、Ctrl+B 等等)。Ghostty 原生支持 Kitty 键盘协议,按键识别更准确;iTerm2 有自己的键盘扩展,部分组合键就会跟 AI 工具打架。
- 备用屏幕缓冲区:启用
CLAUDE_CODE_NO_FLICKER=1后,在 Ghostty 中运行相当流畅,但在 iTerm2 里就容易触发前面列的那些 Issues。
实际使用感受
说起来也有意思——在普通的流式输出场景里,iTerm2 和 Ghostty 差别不大。毕竟现在电脑性能都强,CPU 渲染在直观感受上确实很难跟 GPU 拉开差距。但是,一旦终端里积累了大量文本输出,滚动鼠标去翻阅历史的时候,差别就来了:iTerm2 有明显的顿挫感,而 Ghostty 依然流畅如初。这才是真正的体验分水岭。
安装与配置 Ghostty
下面是我个人比较偏好的配置组合,大家可以按需取用。
1、安装 Ghostty
brew install --cask ghostty2、安装配套工具
# 核心工具
brew install zoxide    # 智能目录跳转(替代 cd)
brew install yazi      # 终端文件管理器:文件浏览、预览、操作等
3、配置
配置文件路径:~/.config/ghostty/config
mkdir -p ~/.config/ghostty# ============================================
# Ghostty Terminal Configuration
# Optimized for AI-assisted development (Claude Code / Codex)
# ============================================
# --- 字体 ---
font-family="Maple Mono NF CN"
font-size=14
font-thicken=true
adjust-cell-height=4
# --- 主题 ---
theme=KanagawaWa ve
# --- 窗口外观 ---
background-opacity=0.95
background-blur-radius=20
macos-titlebar-style= transparent
macos-option-as-alt=true
window-padding-x=14
window-padding-y=10
window-sa ve-state= always
window-inherit-working-directory=true
window-inherit-font-size=true
window-width=120
window-height=35
window-theme=auto
# --- 光标 ---
cursor-style= bar
cursor-style-blink=true
# --- 鼠标 ---
mouse-hide-while-typing=true
copy-on-select= clipboard
link-url=true
# --- 快速终端 (Quake 风格下拉) ---
quick-terminal-position= top
quick-terminal-screen= mouse
quick-terminal-autohide=true
quick-terminal-animation-duration=0.15
# --- 关闭行为 ---
confirm-close-surface=false
# --- 安全 ---
clipboard-paste-protection=true
clipboard-paste-bracketed-safe=true
# --- Shell 集成 ---
shell-integration= detect
shell-integration-features= cursor,sudo,no-title,ssh-env,ssh-terminfo,path
# --- 回滚缓冲区 ---
scrollback-limit=25000000
# ============================================
# 快捷键 (SAND 体系)
# ============================================
# --- 全局快速终端 ---
keybind=global:ctrl+gra ve_accent=toggle_quick_terminal
# --- 标签管理 ---
keybind=super+t=new_tab
keybind=super+w=close_surface
keybind=super+shift+left=previous_tab
keybind=super+shift+right=next_tab
keybind=super+1=goto_tab:1
keybind=super+2=goto_tab:2
keybind=super+3=goto_tab:3
keybind=super+4=goto_tab:4
keybind=super+5=goto_tab:5
# --- 分屏管理 (SAND: Split/Across/Na vigate/Destroy) ---
# S - Split 分屏
keybind=super+d=new_split:right
keybind=super+shift+d=new_split:down
# N - Na vigate 导航
keybind=super+alt+left=goto_split:left
keybind=super+alt+right=goto_split:right
keybind=super+alt+up=goto_split:top
keybind=super+alt+down=goto_split:bottom
# D - Destroy & Equalize
keybind=super+shift+e=equalize_splits
keybind=super+shift+enter=toggle_split_zoom
# --- 字体大小 ---
keybind=super+plus=increase_font_size:1
keybind=super+minus=decrease_font_size:1
keybind=super+zero=reset_font_size
# --- 回滚导航 ---
keybind=super+k=clear_screen
keybind=super+shift+arrow_up=jump_to_prompt:-1
keybind=super+shift+arrow_down=jump_to_prompt:1
# --- 重载配置 ---
keybind=super+shift+comma=reload_config4、配置 Yazi 文件管理器
配置目录:~/.config/yazi/
mkdir -p ~/.config/yazi主配置 ~/.config/yazi/yazi.toml
[mgr]
ratio=[1,2,5]
sort_by="natural"
sort_sensitive=false
sort_reverse=false
sort_dir_first=true
linemode="size"
show_hidden=false
show_symlink=true
scrolloff=5
mouse_events=["click","scroll"]
title_format="Yazi: {cwd}"
[preview]
max_width=600
max_height=900
image_filter="lanczos3"
image_quality=75
[opener]
edit=[
{ run ='code %s', desc ="VSCode",for="unix"},
]
open=[
{ run ='open %s', desc ="Open",for="macos"},
]
reveal=[
{ run ='open -R %1', desc ="Reveal in Finder",for="macos"},
]
[open]
prepend_rules=[
{ mime ="text/*",use=["edit","open","reveal"]},
{ mime ="application/json",use=["edit","open","reveal"]},
{ mime ="*/ja vascript",use=["edit","open","reveal"]},
{ mime ="*/typescript",use=["edit","open","reveal"]},
{ mime ="*/x-yaml",use=["edit","open","reveal"]},
]
[tasks]
micro_workers=10
macro_workers=25
bizarre_retry=5
[plugin]
prepend_fetchers=[
{ id ="git", url ="*", run ="git", prio ="normal",group="git"},
]
快捷键 ~/.config/yazi/keymap.toml
[[manager.prepend_keymap]]
on=["g","h"]
run="cd ~"
desc="Go to home directory"
[[manager.prepend_keymap]]
on=["g","c"]
run="cd ~/.config"
desc="Go to config directory"
[[manager.prepend_keymap]]
on=["g","d"]
run="cd ~/Downloads"
desc="Go to downloads"
[[manager.prepend_keymap]]
on=["g","w"]
run="cd ~/work"
desc="Go to work directory"
[[manager.prepend_keymap]]
on=["g","D"]
run="cd ~/Desktop"
desc="Go to desktop"
[[manager.prepend_keymap]]
on=["g","t"]
run="cd /tmp"
desc= "Go to tmp"
主题 ~/.config/yazi/theme.toml
[mode]
normal_main={ fg ="black", bg ="blue", bold =true}
normal_alt={ fg ="blue", bg ="reset", bold =true}
select_main={ fg ="black", bg ="green", bold =true}
select_alt={ fg ="green", bg ="reset", bold =true}
unset_main={ fg ="black", bg ="red", bold =true}
unset_alt={ fg ="red", bg ="reset", bold =true}
[status]
sep_left={ open ="", close =""}
sep_right={ open ="", close =""}
overall={ fg ="reset", bg ="reset"}
[filetype]
rules=[
{ mime ="image/*", fg ="magenta"},
{ mime ="video/*", fg ="yellow"},
{ mime ="audio/*", fg ="yellow"},
{ mime ="application/zip", fg ="red"},
{ mime ="application/gzip", fg ="red"},
{ mime ="application/x-tar", fg ="red"},
{ mime ="application/pdf", fg ="cyan"},
{ mime ="application/*doc*", fg ="green"},
{ name ="*", fg ="reset"},
{ name ="*/", fg ="blue", bold =true},
]
5、更新 Shell 配置
在 ~/.zshrc 末尾追加以下内容:
# =================== AI Development Optimizations ===================
# Claude Code: enable alternate screen buffer for smoother rendering
export CLAUDE_CODE_NO_FLICKER=1
# Hide agnoster theme username@hostname (cleaner prompt)
DEFAULT_USER="$USER"
# =================== Ghostty Title ===================
if [[ -n "${GHOSTTY_RESOURCES_DIR:-}" ]]; then
    ghostty_set_title() {
        local dir="${PWD/#$HOME/~}"
        printf '\033]2;%s\033\\' "$dir"
    }
    autoload -Uz add-zsh-hook
    add-zsh-hook chpwd ghostty_set_title
    add-zsh-hook precmd ghostty_set_title
    add-zsh-hook preexec ghostty_set_title
    ghostty_set_title
fi
# =================== Yazi File Manager ===================
function y() {
    local tmp="$(mktemp -t "yazi-cwd.XXXXXX")" cwd
    yazi "$@" --cwd-file="$tmp"
    if cwd="$(command cat -- "$tmp")" && [ -n "$cwd" ] && [ "$cwd" != "$PWD" ]; then
        builtin cd -- "$cwd"
    fi
    rm -f -- "$tmp"
}
# =================== Zoxide Smart Directory Jump ===================
eval "$(zoxide init zsh)"
配置说明:
| 配置 | 作用 |
CLAUDE_CODE_NO_FLICKER=1 |
启用备用屏幕缓冲区,Claude Code 渲染不闪烁,内存占用恒定 |
DEFAULT_USER |
agnoster 主题下隐藏 user@host,提示符更简洁 |
Ghostty Title |
自动将终端标题设为当前目录,方便区分多标签 |
y() 函数 |
退出 Yazi 时自动 cd 到最后浏览的目录 |
zoxide init |
初始化智能目录跳转 |
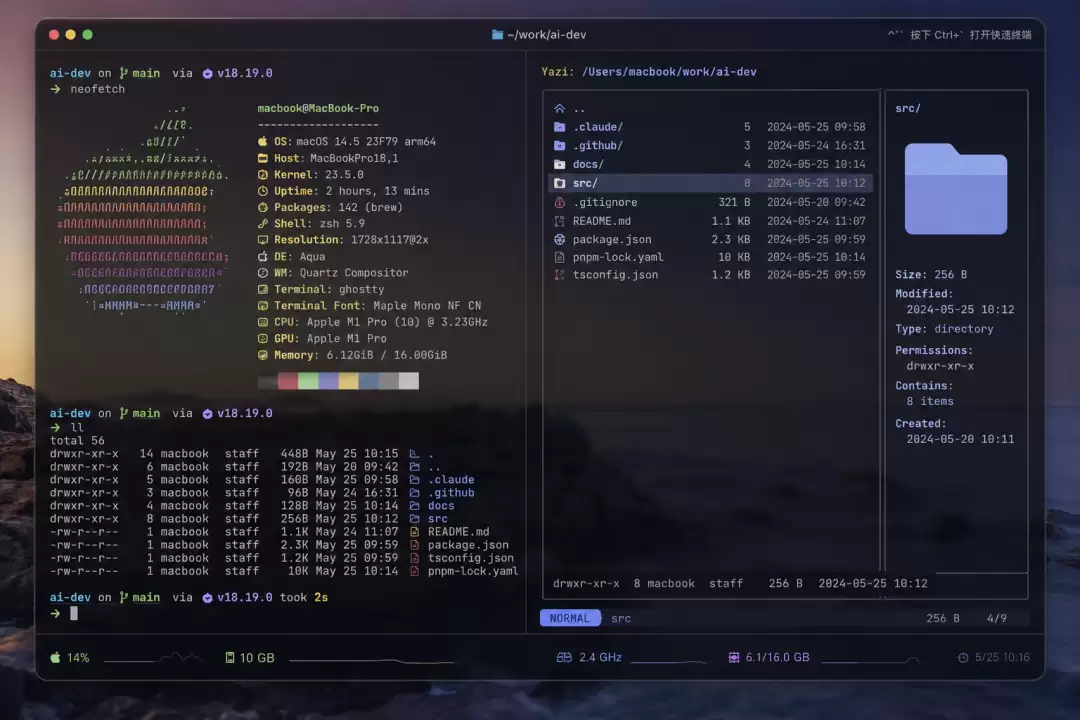
附录:快捷键汇总
Ghostty 分屏 & 标签
| 操作 | 快捷键 |
| 新建标签 | Cmd+T |
| 关闭面板/标签 | Cmd+W |
| 切换标签 | Cmd+Shift+←/→ |
| 跳转第 N 个标签 | Cmd+1~5 |
| 右分屏 | Cmd+D |
| 下分屏 | Cmd+Shift+D |
| 面板间导航 | Cmd+Alt+方向键 |
| 均分面板 | Cmd+Shift+E |
| 面板全屏切换 | Cmd+Shift+Enter |
| 全局快速终端 | Ctrl+`` |
| 重载配置 | Cmd+Shift+, |
Ghostty 滚动 & 导航
| 操作 | 快捷键 |
| 清屏 | Cmd+K |
| 跳到上一条命令 | Cmd+Shift+↑ |
| 跳到下一条命令 | Cmd+Shift+↓ |
| 滚动到顶部 | Cmd+Home |
| 滚动到底部 | Cmd+End |
| 翻页 | Cmd+PageUp/PageDown |
Zoxide
| 命令 | 说明 |
z work |
跳转到最常访问的含 "work" 的目录 |
z foo bar |
跳转到同时匹配 "foo" 和 "bar" 的目录 |
zi work |
交互式选择匹配项 |
z -l |
列出所有记录的目录 |
Yazi
| 命令/按键 | 说明 |
y |
启动 Yazi,退出后自动 cd |
gh / gc / gd / gw |
快捷跳转(在 Yazi 内) |
Enter |
进入目录 / 打开文件 |
Space |
选中文件 |
y / x / p |
复制 / 剪切 / 粘贴 |
d / D |
移到回收站 / 永久删除 |
/ |
搜索 |
q |
退出 |
你是一名 AI 行业编辑,请围绕下面这条热点输出一份资讯解读:
热点:Ghostty终端真实使用体验深度评测要求:
1. 先用一句话解释这条热点在讲什么
2. 再总结它为什么重要
3. 说明会影响哪些 AI 产品或内容方向
4. 最后给出 3 个适合资讯站使用的标题
游乐网为非赢利性网站,所展示的游戏/软件/文章内容均来自于互联网或第三方用户上传分享,版权归原作者所有,本站不承担相应法律责任。如您发现有涉嫌抄袭侵权的内容,请联系youleyoucom@outlook.com。
 相关热点
相关热点度加剪辑是百度官方出品的剪辑工具,面向口播自媒体创作者。支持视频剪辑、智能识别字幕,并与百度网盘打通,可快速导入素材。适用于泛知识类创作者制作高质量视频,覆盖从素材导入到成品输出的完整流程。
WorkoutMaster是一款基于AI的个性化锻炼计划生成工具,能根据用户目标、偏好及历史训练记录,动态输出专属方案,并实时自适应调整负重、组次等参数。支持定制目标与器械偏好,借助机器学习持续优化,随时随地即可接入使用,确保训练高效安全。
Calorielens是一款利用AI分析餐食照片的卡路里追踪应用。用户只需拍照,AI即可自动识别食物种类和分量并估算卡路里,省去手动输入步骤。应用还提供历史记录追踪功能,帮助把握热量趋势。AI估算精度可满足日常健康管理需求。
百度旗下“简单搜索”AI搜索引擎集成语音、图像、多媒体搜索及实时翻译,支持多模态交互与智能推荐。基于大模型技术,用户可通过对话式交互直接获取精准答案,适用于学习、旅行、生活、职业发展等场景,高效满足信息需求。
- 日榜
- 周榜
- 月榜
热点快看