




一文读懂常见人工智能库:全面简洁的介绍

本文介绍了人工智能领域常用的Python库,包括数值计算的NumPy、SciPy、Pandas,数据可视化的Matplotlib、Seaborn,以及图像处理的OpenCV和scikit-image,分别概述了各库的核心功能与典型应用场景,如矩阵运算、统计绘图、图像滤波等,广泛应用于科学研究与工程实践。
欢迎阅读本篇人工智能 Python 库快速指南!对于刚踏入 AI 领域的初学者而言,面对众多 Python 库可能会感到眼花缭乱。本教程将系统梳理当前最常用的人工智能相关库,涵盖数值计算、图像处理、机器学习、深度学习、自然语言处理等多个方向。每个库都会给出清晰的定义、核心功能说明以及简易代码示例,助你快速建立直观认知。无论你是零基础新手还是希望拓展技术边界的开发者,这份指南都能为你选择合适的学习路径提供高效参考。
一、数值计算与数据处理基础
这些库构成了 AI 生态的基石,几乎所有上层库都依赖于它们。掌握这些工具能让你高效处理大规模数据与复杂数学运算。
Numpy
NumPy(Numerical Python) 是 Python 中一个核心扩展库,支持大规模多维数组与矩阵运算,并提供丰富的数学函数库。NumPy 底层采用 C 语言编写,数组中直接存储对象而非对象指针,因此其运算效率远超纯 Python 代码。我们可以通过下方示例对比纯 Python 与 NumPy 在计算列表正弦值时的速度差异:
import numpy as np
import math
import random
import time
start = time.time()
for i in range(10):
    list_1 = list(range(1,10000))
    for j in range(len(list_1)):
        list_1[j] = math.sin(list_1[j])
print("使用纯Python用时{}s".format(time.time()-start))
start = time.time()
for i in range(10):
    list_1 = np.array(np.arange(1,10000))
    list_1 = np.sin(list_1)
print("使用Numpy用时{}s".format(time.time()-start))
从运行结果可以看出,使用 NumPy 库的速度明显快于纯 Python 编写的代码:
使用纯Python用时0.017444372177124023s
使用Numpy用时0.001619577407836914s
提示: 在需要进行大量数学运算(尤其是科学计算或机器学习)时,尽量用 NumPy 数组替代 Python 原生列表,性能可提升数倍甚至数百倍。
常见问题:
Q:NumPy 和 Python 列表有什么区别?
A:NumPy 数组在内存中连续存储且元素类型必须相同(同质),因此计算效率高;Python 列表可存储不同类型,但遍历和运算速度较慢。此外 NumPy 提供大量向量化函数,可避免显式循环。
SciPy
SciPy 库提供了许多用户友好且高效的数值计算功能,涵盖数值积分、插值、优化、线性代数等领域。SciPy 库定义了大量数学物理中的特殊函数,包括椭圆函数、贝塞尔函数、伽马函数、贝塔函数、超几何函数、抛物线圆柱函数等。
from scipy import special
import matplotlib.pyplot as plt
import numpy as np
def drumhead_height(n, k, distance, angle, t):
    kth_zero = special.jn_zeros(n, k)[-1]
    return np.cos(t) * np.cos(n*angle) * special.jn(n, distance*kth_zero)
theta = np.r_[0:2*np.pi:50j]
radius = np.r_[0:1:50j]
x = np.array([r * np.cos(theta) for r in radius])
y = np.array([r * np.sin(theta) for r in radius])
z = np.array([drumhead_height(1, 1, r, theta, 0.5) for r in radius])
fig = plt.figure()
ax = fig.add_axes(rect=(0, 0.05, 0.95, 0.95), projection='3d')
ax.plot_surface(x, y, z, rstride=1, cstride=1, cmap='RdBu_r', vmin=-0.5, vmax=0.5)
ax.set_xlabel('X')
ax.set_ylabel('Y')
ax.set_xticks(np.arange(-1, 1.1, 0.5))
ax.set_yticks(np.arange(-1, 1.1, 0.5))
ax.set_zlabel('Z')
plt.show()
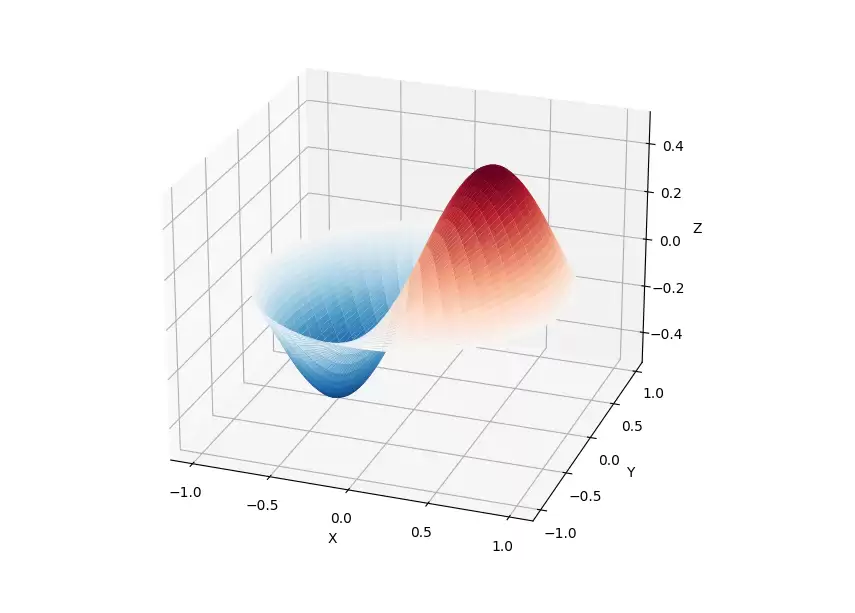
提示: SciPy 常与 NumPy、Matplotlib 配合使用,堪称科学计算领域的“三驾马车”。
常见问题:
Q:SciPy 和 NumPy 功能有重叠吗?
A:有重叠。NumPy 侧重数组与基础线性代数,而 SciPy 在其基础上提供更高级的优化、统计、信号处理等模块。通常先安装 NumPy,再安装 SciPy。
Pandas
Pandas 是一个快速、强大、灵活且易于使用的开源数据分析和操作工具。它能够从 CSV、JSON、SQL、Microsoft Excel 等多种文件格式导入数据,并进行归并、重塑、选择、数据清洗与特征加工等操作。Pandas 广泛应用于学术、金融、统计学等数据分析领域。
import matplotlib.pyplot as plt
import pandas as pd
import numpy as np
ts = pd.Series(np.random.randn(1000), index=pd.date_range("1/1/2000", periods=1000))
ts = ts.cumsum()
df = pd.DataFrame(np.random.randn(1000, 4), index=ts.index, columns=list("ABCD"))
df = df.cumsum()
df.plot()
plt.show()
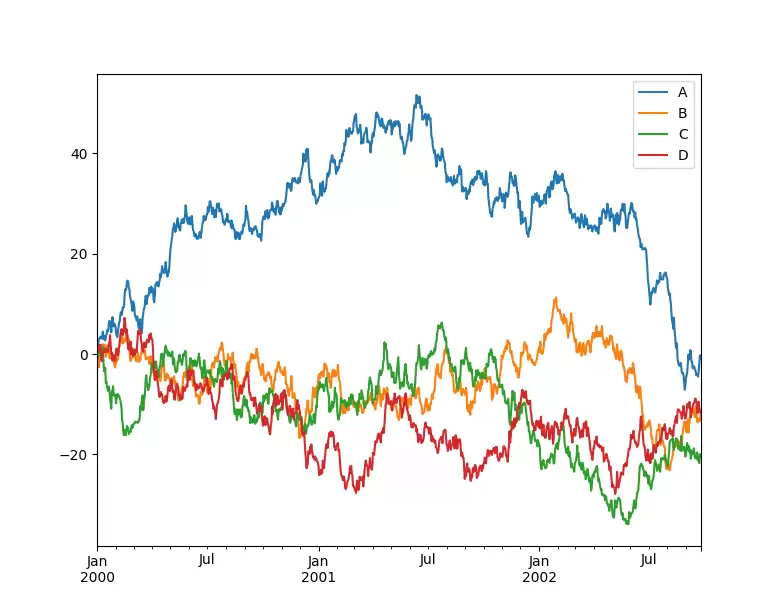
提示: 处理表格数据(如 Excel、CSV)时,Pandas 的 DataFrame 是首选工具,结合 Matplotlib 即可快速完成可视化。
常见问题:
Q:Pandas 和 NumPy 的关系?
A:Pandas 底层大量使用 NumPy,其 DataFrame 的每个列本质上是 NumPy 数组。Pandas 在此基础上提供了更高级的标签索引、数据对齐、缺失值处理等功能。
Matplotlib
Matplotlib 是 Python 的绘图库,它提供了一套与 MATLAB 相似的命令 API,能够生成出版质量级别的精美图形。Matplotlib 让绘图变得非常简单,在易用性和性能之间取得了出色的平衡。以下展示使用 Matplotlib 绘制多曲线图:
# plot_multi_curve.py
import numpy as np
import matplotlib.pyplot as plt
x = np.linspace(0.1, 2 * np.pi, 100)
y_1 = x
y_2 = np.square(x)
y_3 = np.log(x)
y_4 = np.sin(x)
plt.plot(x,y_1)
plt.plot(x,y_2)
plt.plot(x,y_3)
plt.plot(x,y_4)
plt.show()
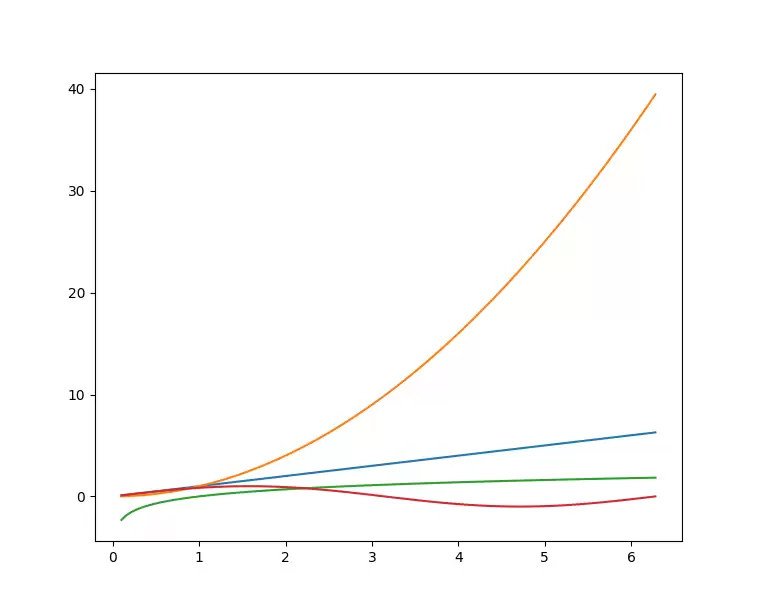
提示: Matplotlib 的默认样式较为朴素,可通过 plt.style.use() 切换不同主题(如 'ggplot'、'seaborn')。
常见问题:
Q:如何在 Jupyter Notebook 中内嵌 Matplotlib 图片?
A:在 Notebook 中运行 %matplotlib inline 即可,或使用 %matplotlib notebook 获得交互式图表。
Seaborn
Seaborn 是在 Matplotlib 基础上进行更高级 API 封装的 Python 数据可视化库,从而让作图更加便捷。应将 Seaborn 视为 Matplotlib 的补充,而非替代品。
import seaborn as sns
import matplotlib.pyplot as plt
sns.set_theme(style="ticks")
df = sns.load_dataset("penguins")
sns.pairplot(df, hue="species")
plt.show()
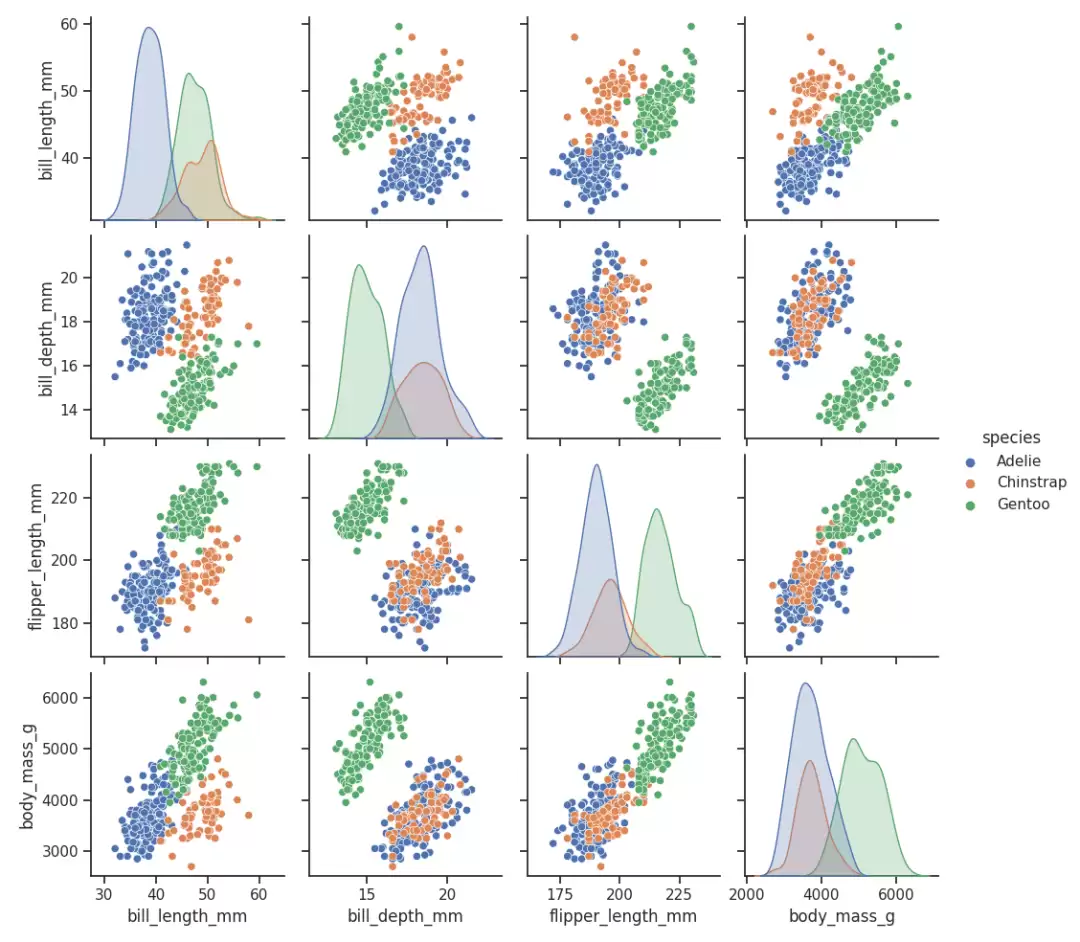
提示: 使用 Seaborn 可以快速绘制统计图表(如热力图、箱线图、分布图),默认配色和样式更加美观。
常见问题:
Q:Seaborn 能完全替代 Matplotlib 吗?
A:不能。Seaborn 简化了常见统计图的创建,但遇到高度自定义的图表仍需回到 Matplotlib 进行微调。
二、图像处理库
在计算机视觉、图像识别等任务中,这些库提供了加载、处理、分析图像的基础能力。
OpenCV
OpenCV 是一个跨平台计算机视觉库,可在 Linux、Windows 和 Mac OS 上运行。它轻量且高效——由一系列 C 函数和少量 C++ 类构成,同时提供 Python 接口,实现了图像处理和计算机视觉方面的众多通用算法。下面代码尝试使用一些简易滤镜,包括图像平滑、高斯模糊等:
import numpy as np
import cv2 as cv
from matplotlib import pyplot as plt
img = cv.imread('h89817032p0.png')
kernel = np.ones((5,5),np.float32)/25
dst = cv.filter2D(img,-1,kernel)
blur_1 = cv.GaussianBlur(img,(5,5),0)
blur_2 = cv.bilateralFilter(img,9,75,75)
plt.figure(figsize=(10,10))
plt.subplot(221),plt.imshow(img[:,:,::-1]),plt.title('Original')
plt.xticks([]), plt.yticks([])
plt.subplot(222),plt.imshow(dst[:,:,::-1]),plt.title('A veraging')
plt.xticks([]), plt.yticks([])
plt.subplot(223),plt.imshow(blur_1[:,:,::-1]),plt.title('Gaussian')
plt.xticks([]), plt.yticks([])
plt.subplot(224),plt.imshow(blur_1[:,:,::-1]),plt.title('Bilateral')
plt.xticks([]), plt.yticks([])
plt.show()
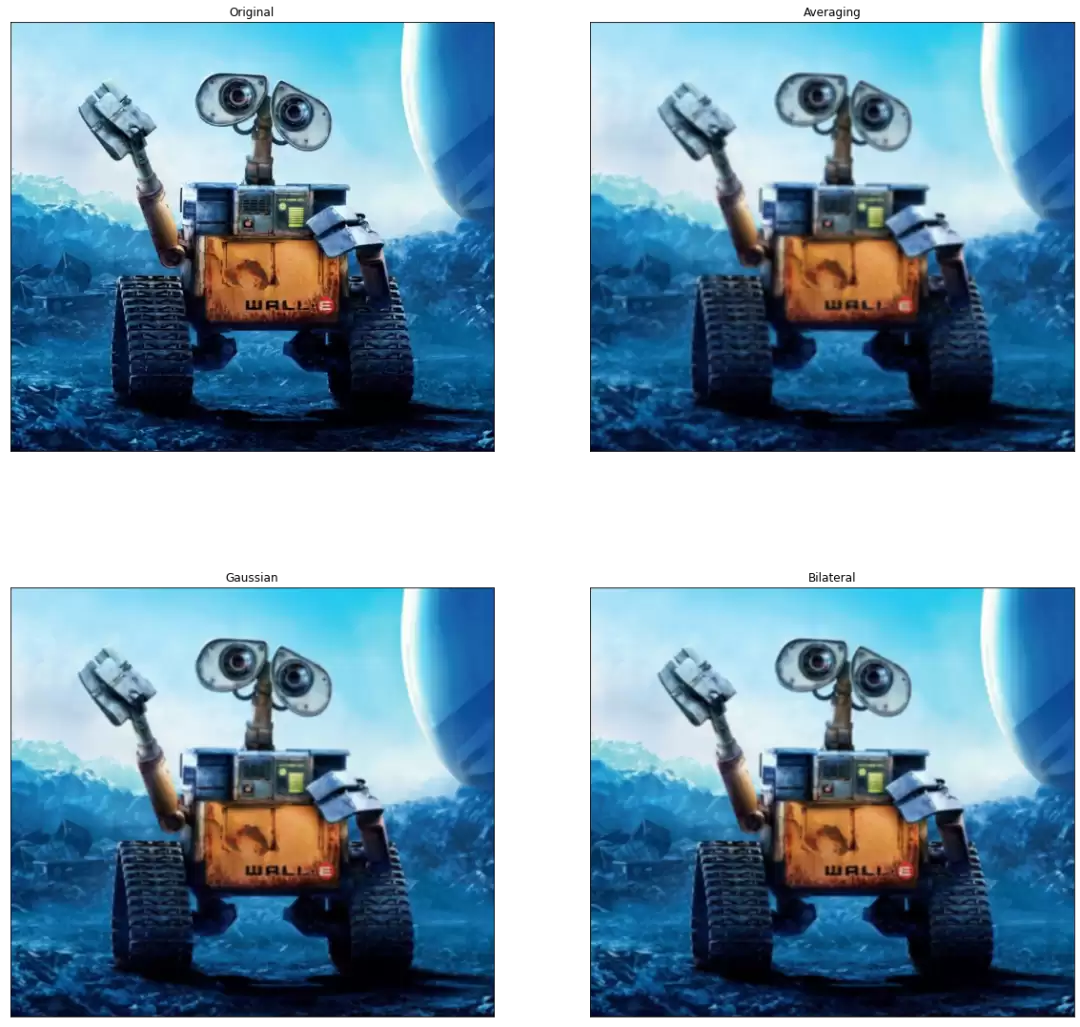
提示: OpenCV 读取的图片默认是 BGR 格式,而 Matplotlib 显示需要 RGB,因此常用 img[:,:,::-1] 进行转换。
常见问题:
Q:OpenCV 能用于深度学习推理吗?
A:可以。OpenCV 提供了 DNN 模块,支持加载 Caffe、TensorFlow、PyTorch 等框架的模型进行推理。
Scikit-image
scikit-image 是基于 SciPy 的图像处理库,它将图片作为 NumPy 数组进行处理。例如,可以利用 scikit-image 改变图片比例,它提供了 rescale、resize 以及 downscale_local_mean 等函数。
from skimage import data, color, io
from skimage.transform import rescale, resize, downscale_local_mean
image = color.rgb2gray(io.imread('h89817032p0.png'))
image_rescaled = rescale(image, 0.25, anti_aliasing=False)
image_resized = resize(image, (image.shape[0] // 4, image.shape[1] // 4),
                       anti_aliasing=True)
image_downscaled = downscale_local_mean(image, (4, 3))
plt.figure(figsize=(20,20))
plt.subplot(221),plt.imshow(image, cmap='gray'),plt.title('Original')
plt.xticks([]), plt.yticks([])
plt.subplot(222),plt.imshow(image_rescaled, cmap='gray'),plt.title('Rescaled')
plt.xticks([]), plt.yticks([])
plt.subplot(223),plt.imshow(image_resized, cmap='gray'),plt.title('Resized')
plt.xticks([]), plt.yticks([])
plt.subplot(224),plt.imshow(image_downscaled, cmap='gray'),plt.title('Downscaled')
plt.xticks([]), plt.yticks([])
plt.show()
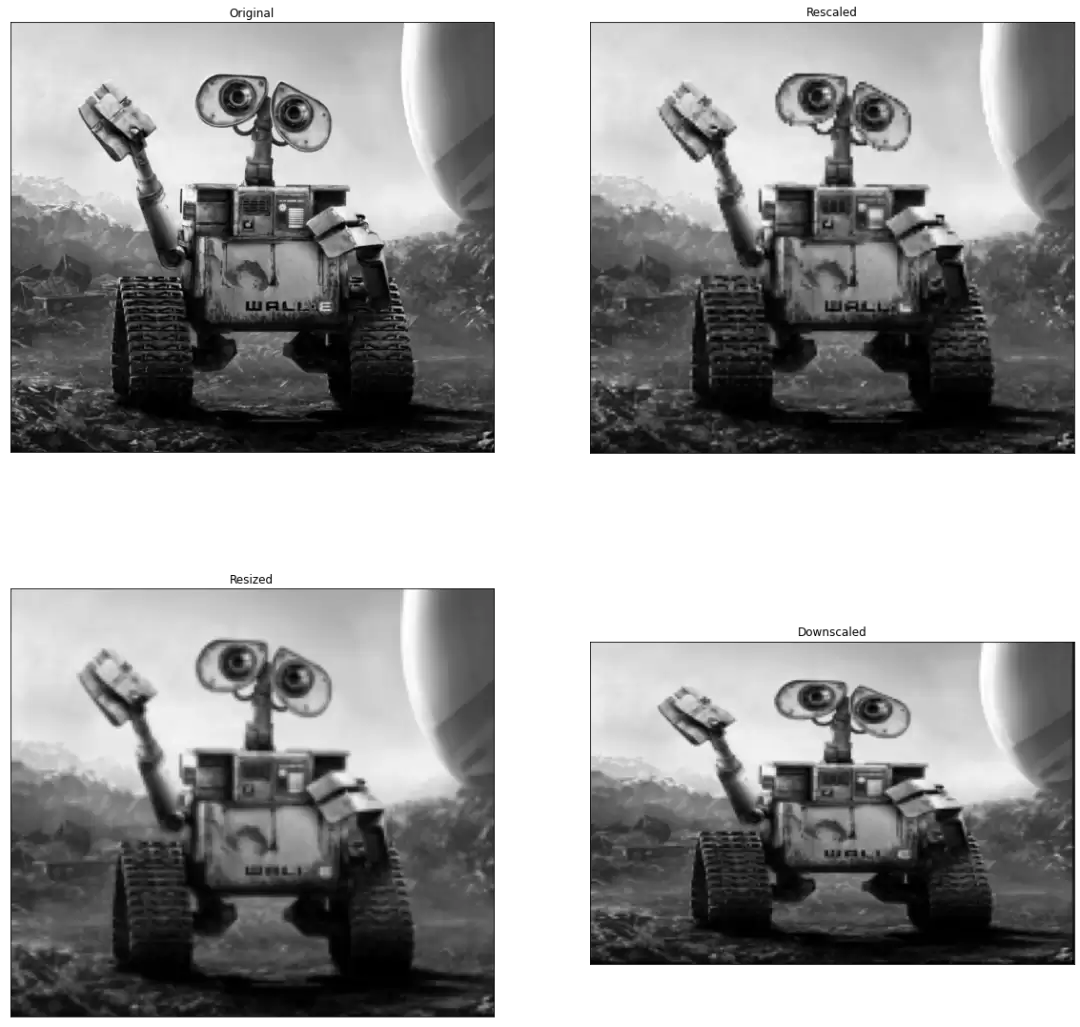
提示: scikit-image 还包含特征提取(如 HOG、SIFT)、分水岭算法、形态学操作等,非常适合图像分析研究。
常见问题:
Q:scikit-image 和 OpenCV 哪个更好?
A:两者侧重点不同。OpenCV 偏重实时应用和底层优化,scikit-image 更易用且与科学计算生态集成更紧密。建议根据任务选择,也可结合使用。
PIL / Pillow
Python Imaging Library(PIL)已成为 Python 事实上的图像处理标准库,功能强大且 API 简单易用。但由于 PIL 仅支持到 Python 2.7,且长期未更新,一批志愿者在其基础上创建了兼容版本——Pillow,支持最新 Python 3.x,并加入了许多新特性。因此,我们可以跳过 PIL,直接安装使用 Pillow。
使用 Pillow 生成字母验证码图片:
from PIL import Image, ImageDraw, ImageFont, ImageFilter
import random
# 随机字母:
def rndChar():
    return chr(random.randint(65, 90))
# 随机颜色1:
def rndColor():
    return (random.randint(64, 255), random.randint(64, 255), random.randint(64, 255))
# 随机颜色2:
def rndColor2():
    return (random.randint(32, 127), random.randint(32, 127), random.randint(32, 127))
# 240 x 60:
width = 60 * 6
height = 60 * 6
image = Image.new('RGB', (width, height), (255, 255, 255))
# 创建Font对象:
font = ImageFont.truetype('/usr/share/fonts/wps-office/simhei.ttf', 60)
# 创建Draw对象:
draw = ImageDraw.Draw(image)
# 填充每个像素:
for x in range(width):
    for y in range(height):
        draw.point((x, y), fill=rndColor())
# 输出文字:
for t in range(6):
    draw.text((60 * t + 10, 150), rndChar(), font=font, fill=rndColor2())
# 模糊:
image = image.filter(ImageFilter.BLUR)
image.sa ve('code.jpg', 'jpeg')

提示: 推荐直接安装 Pillow 而非 PIL,命令为:pip install Pillow。
常见问题:
Q:Pillow 能处理视频吗?
A:不能,Pillow 仅用于静态图像。处理视频需要配合 OpenCV 或 moviepy。
SimpleCV
SimpleCV 是一个用于构建计算机视觉应用程序的开源框架。使用它,你可以访问高性能的计算机视觉库(如 OpenCV),而无需先了解位深度、文件格式、颜色空间、缓冲区管理、特征值或矩阵等术语。但它对 Python 3 的支持很差,在 Python 3.7 中使用如下代码:
from SimpleCV import Image, Color, Display
# load an image from imgur
img = Image('http://i.imgur.com/lfAeZ4n.png')
# use a keypoint detector to find areas of interest
feats = img.findKeypoints()
# draw the list of keypoints
feats.draw(color=Color.RED)
# show the  resulting image.
img.show()
# apply the stuff we found to the image.
output = img.applyLayers()
# sa ve the results.
output.sa ve('juniperfeats.png')
会报如下错误,因此不建议在 Python 3 中使用:
SyntaxError: Missing parentheses in call to 'print'. Did you mean print('unit test')?
注意: SimpleCV 已停止维护,且仅支持 Python 2。建议直接学习 OpenCV 作为替代。
常见问题:
Q:有没有类似 SimpleCV 但支持 Python 3 的库?
A:可以尝试使用 imutils 或直接通过 cv2 调用 OpenCV,学习曲线会更平滑。
Mahotas
Mahotas 是一个快速的计算机视觉算法库,构建在 NumPy 之上,目前拥有超过 100 种图像处理和计算机视觉功能,且仍在不断增长。使用 Mahotas 加载图像并对像素进行操作:
import numpy as np
import mahotas
import mahotas.demos
from mahotas.thresholding import soft_threshold
from matplotlib import pyplot as plt
from os import path
f = mahotas.demos.load('lena', as_grey=True)
f = f[128:,128:]
plt.gray()
# Show the data:
print("Fraction of zeros in original image: {0}".format(np.mean(f==0)))
plt.imshow(f)
plt.show()
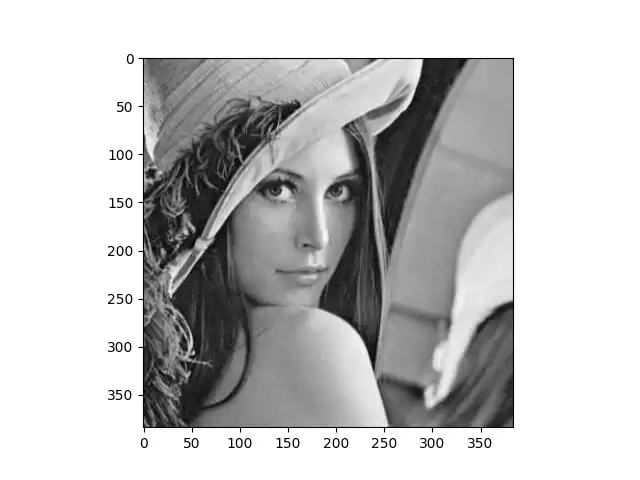
提示: Mahotas 的部分算法(如阈值处理、距离变换)速度快且内存占用低,适合批量图像处理。
常见问题:
Q:Mahotas 和 OpenCV 性能对比?
A:Mahotas 的某些算法(如局部二值模式 LBP)比 OpenCV 更快,但功能覆盖不如 OpenCV 全面。
Ilastik
Ilastik 能为用户提供良好的基于机器学习的生物信息图像分析服务,利用机器学习算法轻松完成细胞或其他实验数据的分割、分类、跟踪和计数。大多数操作都是交互式的,无需机器学习专业知识。
注意:Ilastik 是一个独立软件(非纯 Python 库),但也提供 Python 接口(如 ilastik Python API 或通过命令行调用)。通常用户直接使用其图形界面进行操作,无需编写代码。
常见问题:
Q:如何将 Ilastik 的训练结果集成到 Python 中?
A:Ilastik 可导出模型为 HDF5 或 ONNX 格式,然后在 Python 中用 ilastik 包加载或使用相应的推理库。
三、传统机器学习库
这些库提供了各种分类、回归、聚类算法,是机器学习入门的核心工具。
Scikit-learn
Scikit-learn 是针对 Python 编程语言的免费机器学习库。它包含各种分类、回归和聚类算法,如支持向量机、随机森林、梯度提升、K 均值和 DBSCAN 等。以下使用 Scikit-learn 实现 KMeans 算法:
import time
import numpy as np
import matplotlib.pyplot as plt
from sklearn.cluster import MiniBatchKMeans, KMeans
from sklearn.metrics.pairwise import pairwise_distances_argmin
from sklearn.datasets import make_blobs

# Generate sample data
np.random.seed(0)
batch_size = 45
centers = [[1, 1], [-1, -1], [1, -1]]
n_clusters = len(centers)
X, labels_true = make_blobs(n_samples=3000, centers=centers, cluster_std=0.7)

# Compute clustering with Means
k_means = KMeans(init='k-means++', n_clusters=3, n_init=10)
t0 = time.time()
k_means.fit(X)
t_batch = time.time() - t0

# Compute clustering with MiniBatchKMeans
mbk = MiniBatchKMeans(init='k-means++', n_clusters=3, batch_size=batch_size,
                      n_init=10, max_no_improvement=10, verbose=0)
t0 = time.time()
mbk.fit(X)
t_mini_batch = time.time() - t0

# Plot result
fig = plt.figure(figsize=(8, 3))
fig.subplots_adjust(left=0.02, right=0.98, bottom=0.05, top=0.9)
colors = ['#4EACC5', '#FF9C34', '#4E9A06']

# We want to ha ve the same colors for the same cluster from the
# MiniBatchKMeans and the KMeans algorithm. Let's pair the cluster centers per
# closest one.
k_means_cluster_centers = k_means.cluster_centers_
order = pairwise_distances_argmin(k_means.cluster_centers_,
                                  mbk.cluster_centers_)
mbk_means_cluster_centers = mbk.cluster_centers_[order]
k_means_labels = pairwise_distances_argmin(X, k_means_cluster_centers)
mbk_means_labels = pairwise_distances_argmin(X, mbk_means_cluster_centers)

# KMeans
for k, col in zip(range(n_clusters), colors):
    my_members = k_means_labels == k
    cluster_center = k_means_cluster_centers[k]
    plt.plot(X[my_members, 0], X[my_members, 1], 'w',
            markerfacecolor=col, marker='.')
    plt.plot(cluster_center[0], cluster_center[1], 'o', markerfacecolor=col,
            markeredgecolor='k', markersize=6)
plt.title('KMeans')
plt.xticks(())
plt.yticks(())
plt.show()
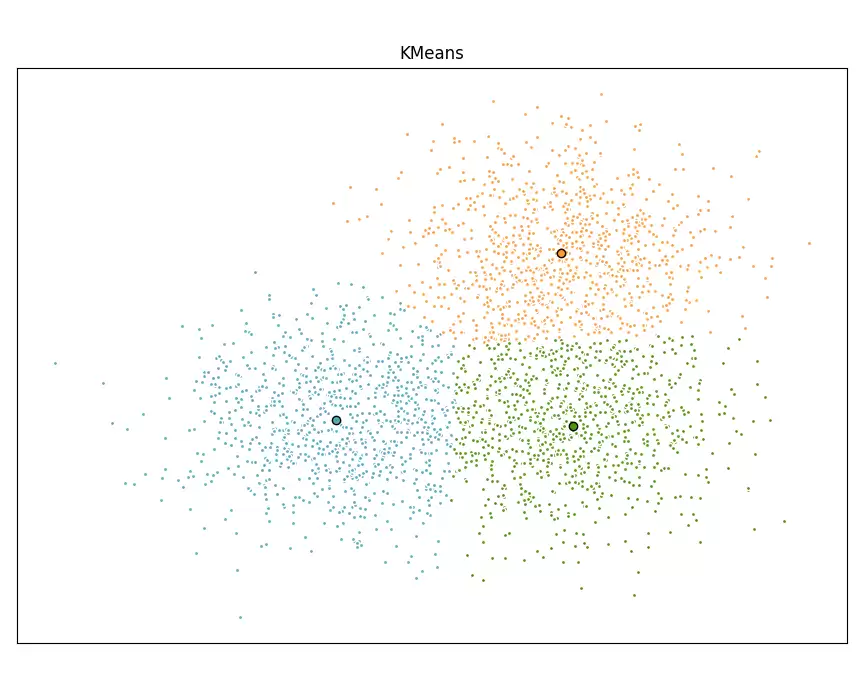
提示: scikit-learn 中的所有算法都遵循统一的 API(fit / predict),学会一个即可快速上手其他算法。
常见问题:
Q:scikit-learn 能处理深度学习吗?
A:不能,它只包含传统机器学习算法。深度学习应使用 TensorFlow、PyTorch 等。
PyBrain
PyBrain 是 Python 的模块化机器学习库,全称为 Python-Based Reinforcement Learning, Artificial Intelligence and Neural Network Library。其目标是为机器学习任务和各种预定义环境提供灵活、易用且强大的算法,便于测试和比较。下面通过一个简单示例展示 PyBrain 的用法——构建多层感知器(MLP)。
from pybrain.structure import FeedForwardNetwork
n = FeedForwardNetwork()
接下来,构建输入层、隐藏层和输出层:
from pybrain.structure import LinearLayer, SigmoidLayer
inLayer = LinearLayer(2)
hiddenLayer = SigmoidLayer(3)
outLayer = LinearLayer(1)
为了使用所构建的层,必须将它们添加到网络中:
n.addInputModule(inLayer)
n.addModule(hiddenLayer)
n.addOutputModule(outLayer)
可以添加多个输入和输出模块。为了进行前向计算和反向误差传播,网络必须明确各层的连接关系。通常采用全连接方式,由 FullConnection 类实现:
from pybrain.structure import FullConnection
in_to_hidden = FullConnection(inLayer, hiddenLayer)
hidden_to_out = FullConnection(hiddenLayer, outLayer)
与层一样,需要将连接添加到网络中:
n.addConnection(in_to_hidden)
n.addConnection(hidden_to_out)
所有元素就绪后,调用 .sortModules() 方法使 MLP 可用:
n.sortModules()
该调用会执行一些内部初始化,这是使用网络前的必要步骤。
注意: PyBrain 目前已很少维护,新项目建议使用 PyTorch 或 scikit-learn 完成类似任务。
常见问题:
Q:PyBrain 支持 GPU 加速吗?
A:不支持,它是纯 CPU 实现,适合学习目的。
Milk
MILK(Machine Learning Toolkit)是 Python 语言的机器学习工具包,主要包含多种分类器,如 SVM、K-NN、随机森林以及决策树中的监督分类法。它还支持特征选择,并可实现无监督学习(如亲和传播和 K-means 聚类)。以下使用 MILK 训练一个分类器:
import numpy as np
import milk
features = np.random.rand(100,10)
labels = np.zeros(100)
features[50:] += .5
labels[50:] = 1
learner = milk.defaultclassifier()
model = learner.train(features, labels)
# Now you can use the model on new examples:
example = np.random.rand(10)
print(model.apply(example))
example2 = np.random.rand(10)
example2 += .5
print(model.apply(example2))
提示: Milk 的 API 非常简洁,适合快速原型开发,但功能不如 scikit-learn 全面。
常见问题:
Q:Milk 还在活跃维护吗?
A:已多年未更新,建议用 scikit-learn 替代。
Orange
Orange 是一个开源的数据挖掘和机器学习软件,提供了一系列数据探索、可视化、预处理以及建模组件。Orange 拥有漂亮直观的交互式用户界面,非常适合新手进行探索性数据分析和可视化展示;同时高级用户也可将其作为 Python 编程模块进行数据操作和组件开发。
$ pip install orange3
安装完成后,在命令行输入 orange-canvas 命令即可启动 Orange 图形界面:
$ orange-canvas
启动完成后,即可看到 Orange 图形界面,进行各种操作。
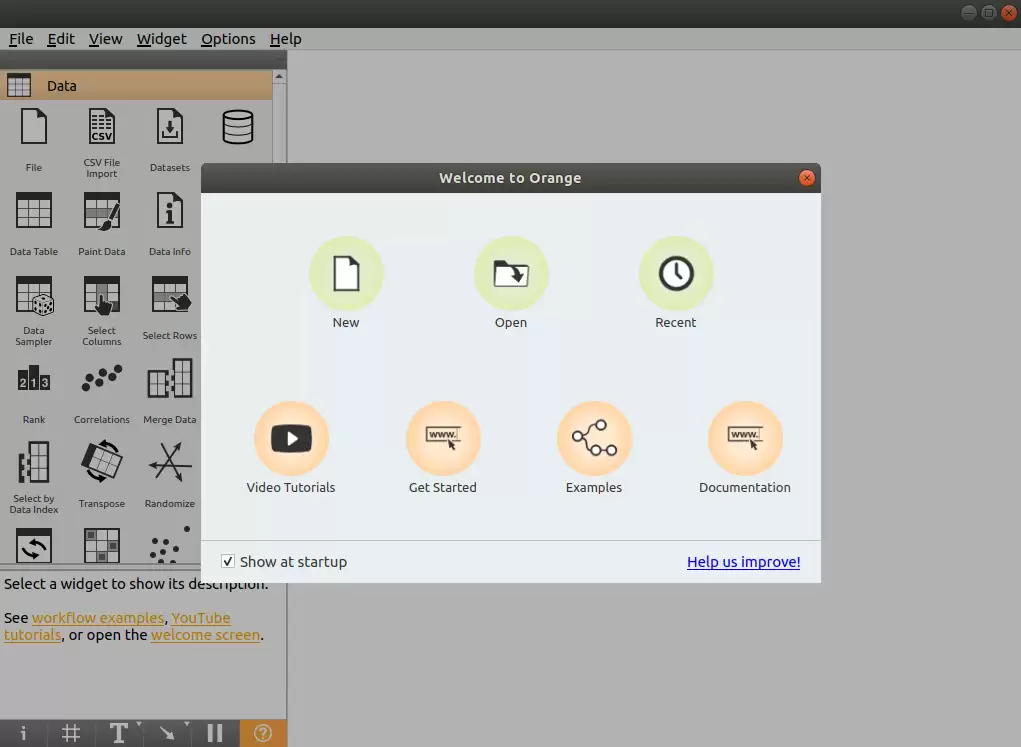
提示: 如果你不想写代码又想尝试机器学习,Orange 是非常友好的工具。它内置了多种数据可视化、分类、聚类、回归等功能。
常见问题:
Q:Orange 的 Python 模块如何导入?
A:导入 import Orange 即可。可以使用 Orange.data.Table 加载数据,Orange.classification 训练模型等。
四、深度学习框架
深度学习框架是构建和训练神经网络的基石,目前主流的框架包括 TensorFlow、PyTorch 等。以下逐一介绍。
TensorFlow
TensorFlow 是一个端到端的开源机器学习平台,拥有全面而灵活的生态系统。通常分为 TensorFlow 1.x 和 TensorFlow 2.x,主要区别在于 TF1.x 使用静态图,而 TF2.x 采用 Eager Mode 动态图。这里主要使用 TensorFlow 2.x 作为示例,展示如何构建卷积神经网络(CNN)。
import tensorflow as tf
from tensorflow.keras import datasets, layers, models

# 数据加载
(train_images, train_labels), (test_images, test_labels) = datasets.cifar10.load_data()
# 数据预处理
train_images, test_images = train_images / 255.0, test_images / 255.0

# 模型构建
model = models.Sequential()
model.add(layers.Conv2D(32, (3, 3), activation='relu', input_shape=(32, 32, 3)))
model.add(layers.MaxPooling2D((2, 2)))
model.add(layers.Conv2D(64, (3, 3), activation='relu'))
model.add(layers.MaxPooling2D((2, 2)))
model.add(layers.Conv2D(64, (3, 3), activation='relu'))
model.add(layers.Flatten())
model.add(layers.Dense(64, activation='relu'))
model.add(layers.Dense(10))

# 模型编译与训练
model.compile(optimizer='adam',
              loss=tf.keras.losses.SparseCategoricalCrossentropy(from_logits=True),
              metrics=['accuracy'])
history = model.fit(train_images, train_labels, epochs=10,
                    validation_data=(test_images, test_labels))
提示: TensorFlow 2.x 默认启用 Eager Execution,代码写起来像原生 Python 一样直观,并且支持动态计算图。
常见问题:
Q:TensorFlow 和 Keras 是什么关系?
A:Keras 最初是独立的高级 API,现已整合到 TensorFlow 中(tf.keras)。你可以直接使用 tf.keras 构建模型,无需额外安装。
PyTorch
PyTorch 的前身是 Torch,底层与 Torch 框架一致,但用 Python 重新编写了大量内容,不仅更加灵活、支持动态图,而且提供了 Python 接口。
# 导入库
import torch
from torch import nn
from torch.utils.data import DataLoader
from torchvision import datasets
from torchvision.transforms import ToTensor, Lambda, Compose
import matplotlib.pyplot as plt

# 模型构建
device = "cuda" if torch.cuda.is_a vailable() else "cpu"
print("Using {} device".format(device))

# Define model
class NeuralNetwork(nn.Module):
    def __init__(self):
        super(NeuralNetwork, self).__init__()
        self.flatten = nn.Flatten()
        self.linear_relu_stack = nn.Sequential(
            nn.Linear(28*28, 512),
            nn.ReLU(),
            nn.Linear(512, 512),
            nn.ReLU(),
            nn.Linear(512, 10),
            nn.ReLU()
        )
    def forward(self, x):
        x = self.flatten(x)
        logits = self.linear_relu_stack(x)
        return logits
model = NeuralNetwork().to(device)

# 损失函数和优化器
loss_fn = nn.CrossEntropyLoss()
optimizer = torch.optim.SGD(model.parameters(), lr=1e-3)

# 模型训练
def train(dataloader, model, loss_fn, optimizer):
    size = len(dataloader.dataset)
    for batch, (X, y) in enumerate(dataloader):
        X, y = X.to(device), y.to(device)
        # Compute prediction error
        pred = model(X)
        loss = loss_fn(pred, y)
        # Backpropagation
        optimizer.zero_grad()
        loss.backward()
        optimizer.step()
        if batch % 100 == 0:
            loss, current = loss.item(), batch * len(X)
            print(f"loss: {loss:>7f}  [{current:>5d}/{size:>5d}]")
提示: PyTorch 的动态图机制(Define-by-Run)非常灵活,调试时可以像普通 Python 代码一样打印张量值。
常见问题:
Q:PyTorch 和 TensorFlow 哪个更适合研究?
A:两者都很强大。PyTorch 因简洁灵活在学术界更流行,TensorFlow 在生产部署(如 TensorFlow Serving、TFLite)方面生态更完善。
Theano
Theano 是一个 Python 库,允许定义、优化和高效计算涉及多维数组的数学表达式,构建在 NumPy 之上。以下是在 Theano 中实现雅可比矩阵计算的示例:
import theano
import theano.tensor as T
x = T.dvector('x')
y = x ** 2
J, updates = theano.scan(lambda i, y,x : T.grad(y[i], x), sequences=T.arange(y.shape[0]), non_sequences=[y,x])
f = theano.function([x], J, updates=updates)
f([4, 4])
注意: Theano 已于2017年停止开发,新项目建议使用 PyTorch 或 TensorFlow。此处仅作知识了解。
常见问题:
Q:Theano 和 TensorFlow 的静态图有何区别?
A:Theano 也是静态图,与 TensorFlow 1.x 类似,需要先定义图再运行。现在动态图(如 PyTorch)更易用。
Keras
Keras 是一个用 Python 编写的高级神经网络 API,能够以 TensorFlow、CNTK 或 Theano 作为后端运行。Keras 专注于支持快速实验,让你能以最小的时延将想法转化为实验结果。
from keras.models import Sequential
from keras.layers import Dense

# 模型构建
model = Sequential()
model.add(Dense(units=64, activation='relu', input_dim=100))
model.add(Dense(units=10, activation='softmax'))

# 模型编译与训练
model.compile(loss='categorical_crossentropy',
              optimizer='sgd',
              metrics=['accuracy'])
model.fit(x_train, y_train, epochs=5, batch_size=32)
提示: 如果你希望用最少的代码搭建神经网络,Keras 是绝佳选择。现在 TensorFlow 内置的 tf.keras 就是基于 Keras API 标准。
常见问题:
Q:Keras 和 tf.keras 有什么区别?
A:独立 Keras 库已停止维护,建议使用 tf.keras(即 TensorFlow 中的 Keras 实现),它能完全兼容 TensorFlow 生态。
Caffe / Caffe2
在 Caffe2 官方网站上明确写道:Caffe2 现在已成为 PyTorch 的一部分。虽然现有 API 仍能继续使用,但鼓励使用 PyTorch API。
结论: 新项目直接使用 PyTorch 即可,无需再学习 Caffe。
常见问题:
Q:现有的 Caffe 模型如何迁移?
A:可以使用 ONNX 或转换工具将 Caffe 模型转为 PyTorch 或 TensorFlow 格式。
MXNet
MXNet 是一款兼顾效率与灵活性的深度学习框架,允许混合使用符号编程和命令式编程,从而最大限度提高效率和生产力。以下使用 MXNet 构建手写数字识别模型:
import mxnet as mx
from mxnet import gluon
from mxnet.gluon import nn
from mxnet import autograd as ag
import mxnet.ndarray as F

# 数据加载
mnist = mx.test_utils.get_mnist()
batch_size = 100
train_data = mx.io.NDArrayIter(mnist['train_data'], mnist['train_label'], batch_size, shuffle=True)
val_data = mx.io.NDArrayIter(mnist['test_data'], mnist['test_label'], batch_size)

# CNN模型
class Net(gluon.Block):
    def __init__(self, **kwargs):
        super(Net, self).__init__(**kwargs)
        self.conv1 = nn.Conv2D(20, kernel_size=(5,5))
        self.pool1 = nn.MaxPool2D(pool_size=(2,2), strides = (2,2))
        self.conv2 = nn.Conv2D(50, kernel_size=(5,5))
        self.pool2 = nn.MaxPool2D(pool_size=(2,2), strides = (2,2))
        self.fc1 = nn.Dense(500)
        self.fc2 = nn.Dense(10)
    def forward(self, x):
        x = self.pool1(F.tanh(self.conv1(x)))
        x = self.pool2(F.tanh(self.conv2(x)))
        # 0 means copy over size from corresponding dimension.
        # -1 means infer size from the rest of dimensions.
        x = x.reshape((0, -1))
        x = F.tanh(self.fc1(x))
        x = F.tanh(self.fc2(x))
        return x
net = Net()
# 初始化与优化器定义
# set the context on GPU is a vailable otherwise CPU
ctx = [mx.gpu() if mx.test_utils.list_gpus() else mx.cpu()]
net.initialize(mx.init.Xa vier(magnitude=2.24), ctx=ctx)
trainer = gluon.Trainer(net.collect_params(), 'sgd', {'learning_rate': 0.03})

# 模型训练
# Use Accuracy as the evaluation metric.
metric = mx.metric.Accuracy()
softmax_cross_entropy_loss = gluon.loss.SoftmaxCrossEntropyLoss()
for i in range(epoch):
    # Reset the train data iterator.
    train_data.reset()
    for batch in train_data:
        data = gluon.utils.split_and_load(batch.data[0], ctx_list=ctx, batch_axis=0)
        label = gluon.utils.split_and_load(batch.label[0], ctx_list=ctx, batch_axis=0)
        outputs = []
        # Inside training scope
        with ag.record():
            for x, y in zip(data, label):
                z = net(x)
                # Computes softmax cross entropy loss.
                loss = softmax_cross_entropy_loss(z, y)
                # Backpropogate the error for one iteration.
                loss.backward()
                outputs.append(z)
        metric.update(label, outputs)
        trainer.step(batch.data[0].shape[0])
    # Gets the evaluation result.
    name, acc = metric.get()
    # Reset evaluation result to initial state.
    metric.reset()
    print('training acc at epoch %d: %s=%f'%(i, name, acc))
提示: MXNet 的 Gluon API 设计非常类似 PyTorch,学习成本较低。亚马逊 AWS 的 SageMaker 曾深度依赖 MXNet,但现在也支持 PyTorch 和 TensorFlow。
常见问题:
Q:MXNet 还值得学习吗?
A:社区活跃度已下降,新项目建议优先选择 PyTorch 或 TensorFlow。但如果你正在使用 AWS 生态且已有 MXNet 代码,可继续使用。
PaddlePaddle
飞桨(PaddlePaddle)基于百度多年的深度学习技术研究和业务应用,集深度学习核心训练和推理框架、基础模型库、端到端开发套件、丰富工具组件于一体,是中国首个自主研发、功能完备、开源开放的产业级深度学习平台。以下使用 PaddlePaddle 实现 LeNet5:
# 导入需要的包
import paddle
import numpy as np
from paddle.nn import Conv2D, MaxPool2D, Linear
## 组网
import paddle.nn.functional as F

# 定义 LeNet 网络结构
class LeNet(paddle.nn.Layer):
    def __init__(self, num_classes=1):
        super(LeNet, self).__init__()
        # 创建卷积和池化层
        # 创建第1个卷积层
        self.conv1 = Conv2D(in_channels=1, out_channels=6, kernel_size=5)
        self.max_pool1 = MaxPool2D(kernel_size=2, stride=2)
        # 尺寸的逻辑:池化层未改变通道数;当前通道数为6
        # 创建第2个卷积层
        self.conv2 = Conv2D(in_channels=6, out_channels=16, kernel_size=5)
        self.max_pool2 = MaxPool2D(kernel_size=2, stride=2)
        # 创建第3个卷积层
        self.conv3 = Conv2D(in_channels=16, out_channels=120, kernel_size=4)
        # 尺寸的逻辑:输入层将数据拉平[B,C,H,W] -> [B,C*H*W]
        # 输入size是[28,28],经过三次卷积和两次池化之后,C*H*W等于120
        self.fc1 = Linear(in_features=120, out_features=64)
        # 创建全连接层,第一个全连接层的输出神经元个数为64, 第二个全连接层输出神经元个数为分类标签的类别数
        self.fc2 = Linear(in_features=64, out_features=num_classes)
    # 网络的前向计算过程
    def forward(self, x):
        x = self.conv1(x)
        # 每个卷积层使用Sigmoid激活函数,后面跟着一个2x2的池化
        x = F.sigmoid(x)
        x = self.max_pool1(x)
        x = F.sigmoid(x)
        x = self.conv2(x)
        x = self.max_pool2(x)
        x = self.conv3(x)
        # 尺寸的逻辑:输入层将数据拉平[B,C,H,W] -> [B,C*H*W]
        x = paddle.reshape(x, [x.shape[0], -1])
        x = self.fc1(x)
        x = F.sigmoid(x)
        x = self.fc2(x)
        return x
提示: PaddlePaddle 提供了丰富的官方模型库(PaddleHub、PaddleSeg 等),中文文档和社区支持优秀,非常适合国内用户。
常见问题:
Q:PaddlePaddle 能迁移学习其他框架的模型吗?
A:支持通过 X2Paddle 工具将 TensorFlow、PyTorch、Caffe 等模型转换为 PaddlePaddle 格式。
CNTK
CNTK(Cognitive Toolkit)是一个深度学习工具包,通过有向图将神经网络描述为一系列计算步骤。在有向图中,叶节点表示输入值或网络参数,其他节点表示对输入的矩阵运算。CNTK 可轻松实现和组合流行的模型类型(如 CNN)。它使用网络描述语言(NDL)描述神经网络,简单来说,需要描述输入特征、输入标签、参数、参数与输入之间的计算关系以及目标节点。
NDLNetworkBuilder=[

    run=ndlLR

    ndlLR=[
      # sample and label dimensions
      SDim=$dimension$
      LDim=1

      features=Input(SDim, 1)
      labels=Input(LDim, 1)

      # parameters to learn
      B0 = Parameter(4)
      W0 = Parameter(4, SDim)


      B = Parameter(LDim)
      W = Parameter(LDim, 4)

      # operations
      t0 = Times(W0, features)
      z0 = Plus(t0, B0)
      s0 = Sigmoid(z0)

      t = Times(W, s0)
      z = Plus(t, B)
      s = Sigmoid(z)

      LR = Logistic(labels, s)
      EP = SquareError(labels, s)

      # root nodes
      FeatureNodes=(features)
      LabelNodes=(labels)
      CriteriaNodes=(LR)
      EvalNodes=(EP)
      OutputNodes=(s,t,z,s0,W0)
    ]
注意: CNTK 已停止积极开发,微软已将重心转向 PyTorch 和 TensorFlow。此处仅作为历史了解。
常见问题:
Q:如何运行 CNTK 模型?
A:建议迁移到 ONNX 格式,然后用 ONNX Runtime 推理。
五、自然语言处理库
自然语言处理(NLP)是 AI 的重要分支,以下两个库能帮助你高效处理文本数据。
NLTK
NLTK 是构建 Python 程序以处理自然语言的库,为 50 多个语料库和词汇资源(如 WordNet)提供了易于使用的接口,并包含一套用于分类、分词、词干提取、词性标注、解析和语义推理的文本处理库,以及工业级 NLP 库的包装器。NLTK 被称为“使用 Python 进行计算语言学教学和工作的绝佳工具”。
import nltk
from nltk.corpus import treebank
# 首次使用需要下载
nltk.download('punkt')
nltk.download('a veraged_perceptron_tagger')
nltk.download('maxent_ne_chunker')
nltk.download('words')
nltk.download('treebank')
sentence = """At eight o'clock on Thursday morning Arthur didn't feel very good."""
# Tokenize
tokens = nltk.word_tokenize(sentence)
tagged = nltk.pos_tag(tokens)
# Identify named entities
entities = nltk.chunk.ne_chunk(tagged)
# Display a parse tree
t = treebank.parsed_sents('wsj_0001.mrg')[0]
t.draw()
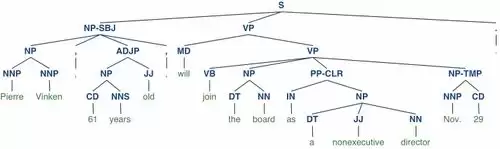
提示: NLTK 是学习和教授 NLP 概念的优秀工具,但在生产应用中速度较慢,建议参考 spaCy 或 Stanford CoreNLP。
常见问题:
Q:NLTK 和 spaCy 有什么区别?
A:NLTK 更偏向教育和研究,功能全面但性能一般;spaCy 专为生产设计,速度快、内存效率高,并提供预训练模型。
spaCy
spaCy 是一个免费的开源库,用于 Python 中的高级 NLP。它可以用于构建处理大量文本的应用程序,也可用于构建信息提取或自然语言理解系统,或者对文本进行预处理以用于深度学习。
import spacy
texts = [
    "Net income was $9.4 million compared to the prior year of $2.7 million.",
    "Revenue exceeded twelve billion dollars, with a loss of $1b.",
]
nlp = spacy.load("en_core_web_sm")
for doc in nlp.pipe(texts, disable=["tok2vec", "tagger", "parser", "attribute_ruler", "lemmatizer"]):
    # Do something with the doc here
    print([(ent.text, ent.label_) for ent in doc.ents])
nlp.pipe 生成 Doc 对象,因此我们可以迭代访问并获取命名实体预测:
[('$9.4 million', 'MONEY'), ('the prior year', 'DATE'), ('$2.7 million', 'MONEY')]
[('twelve billion dollars', 'MONEY'), ('1b', 'MONEY')]
提示: spaCy 的预训练模型覆盖多种语言,可通过 python -m spacy download en_core_web_sm 下载。
常见问题:
Q:spaCy 支持中文吗?
A:支持。有中文模型 zh_core_web_sm 可供下载。
六、音频处理库
LibROSA
LibROSA 是一个用于音乐和音频分析的 Python 库,提供了创建音乐信息检索系统所必需的功能和函数。
# Beat tracking example
import librosa
# 1. Get the file path to an included audio example
filename = librosa.example('nutcracker')
# 2. Load the audio as a wa veform `y`
#    Store the sampling rate as `sr`
y, sr = librosa.load(filename)
# 3. Run the default beat tracker
tempo, beat_frames = librosa.beat.beat_track(y=y, sr=sr)
print('Estimated tempo: {:.2f} beats per minute'.format(tempo))
# 4. Convert the frame indices of beat events into timestamps
beat_times = librosa.frames_to_time(beat_frames, sr=sr)
提示: LibROSA 支持多种音频特征提取,如 MFCC、色谱图、节奏特征等,广泛应用于语音识别和音乐信息检索。
常见问题:
Q:LibROSA 需要安装 FFmpeg 吗?
A:加载音频文件时支持常见格式(WAV、MP3 等),但某些格式可能需要 FFmpeg 后端。建议安装 FFmpeg 以确保兼容性。
通过以上介绍,相信你已经对人工智能领域常用的 Python 库有了全面的认识。从最基础的数值计算(NumPy、SciPy、Pandas),到图像处理(OpenCV、Pillow)、机器学习(scikit-learn)、深度学习(TensorFlow、PyTorch),再到自然语言处理(spaCy)和音频分析(LibROSA),这些工具构成了现代 AI 开发的基石。建议初学者先从 NumPy 和 Pandas 入手,然后根据兴趣方向选择深入学习:若偏好传统机器学习,学 scikit-learn;若想进入深度学习,PyTorch 或 TensorFlow 任选其一;图像处理则重点掌握 OpenCV。记住,实践是最好的老师,尝试动手运行示例代码并解决实际问题,你会进步得更快。祝你学习顺利!
你是一名 AI 行业编辑,请围绕下面这条热点输出一份资讯解读:
热点:一文读懂常见人工智能库:全面简洁的介绍要求:
1. 先用一句话解释这条热点在讲什么
2. 再总结它为什么重要
3. 说明会影响哪些 AI 产品或内容方向
4. 最后给出 3 个适合资讯站使用的标题
游乐网为非赢利性网站,所展示的游戏/软件/文章内容均来自于互联网或第三方用户上传分享,版权归原作者所有,本站不承担相应法律责任。如您发现有涉嫌抄袭侵权的内容,请联系youleyoucom@outlook.com。
 相关热点
相关热点Dzine是一款强调构图控制与风格管理的AI图像设计工具,提供样式库、图层操作、定位和素描工具,支持文生图与图生图,具备生成填充编辑、一键修复增强及最高6144像素超高清导出功能,降低设计门槛,兼顾新手与专业用户。
3D虚拟空间的搭建,过去往往依赖专业建模软件和大量手动操作,技术门槛相当高。但现在,一款名为Arrival的云端SaaS解决方案正凭借AI与拖放功能,将这件事变得像搭积木一样轻松便捷。 什么是Arrival? Arrival本质上是一套专业的软件工具,核心目标就是帮助用户快速构建一个3D虚拟空间。它
ZENAI通过AI自动完成用户访谈,省去人工招募与主持流程,并自动总结用户场景、痛点及人物画像。产品经理、设计师、研究员可借此快速验证假设、提炼场景、获取市场洞察,加速产品市场契合度(PMF)达成,提供基础与专业两种套餐。
MeshcapadeMe基于SMPL人体模型技术,提供API接口支持图像、视频、测量及3D扫描输入,自动生成统一格式的逼真数字分身,无需专业建模技能即可将各类素材转化为可动画、跨平台使用的数字人类,适用于虚拟现实、游戏与影视等领域。
- 日榜
- 周榜
- 月榜
热点快看