




动态组件架构设计全链路解析:从配置到事件驱动

动态组件架构通过配置驱动渲染,利用Vue动态组件机制实现运行时实例化。Schema按需提取字段配置,配合事件处理映射表应用策略模式,组件工厂统一管理,降低耦合,提高复用性,符合开闭原则。
一、引言:为什么需要动态组件?
先谈谈传统 CRUD 开发中那些令人困扰的问题。如果你做过中后台系统,大概率会有这样的体验:每个业务模块都像是同一个模板的复刻版,但每次都要重新编写一遍组件控制逻辑。新增一个功能,模板和脚本都得调整,改完之后还得提心吊胆怕影响其他地方。组件之间耦合度极高,想复用?基本靠复制粘贴。代码量不断攀升,维护成本自然也跟着水涨船高。1.1 传统 CRUD 开发的痛点
具体来说,问题主要集中在以下几个方面: - 每个业务模块都需要重复编写相同的组件控制逻辑 - 新增功能必须修改模板和脚本 - 组件之间耦合度高,难以实现复用 - 代码量大,导致维护成本居高不下1.2 动态组件的解决思路
那么,换一种思路会怎样?核心其实就一句话:把"组件渲染逻辑"从硬编码转变为配置驱动。 来看一个简单的对比。传统方式下,每个页面都要写死各种组件标签;而动态方式,只需要一个配置驱动的模板,剩下的交给系统自动处理。 复制代码
<template>
<div>
<el-table :data="tableData">...el-table>
<component
v-for="(component, key) in components"
:key="key"
:is="ComponentConfig[key]?.component"
:ref="(el) => { if (el) comMapRef[key] = el }"
/>
div>
template>
这种做法的优势非常显著:
- 业务逻辑通过配置文件描述,一目了然
- 新增功能只需添加配置,无需改动组件代码
- 组件高度复用,开发成本自然降低
- 符合开闭原则,扩展起来非常顺手
二、核心实现原理
2.1 动态组件机制
Vue 的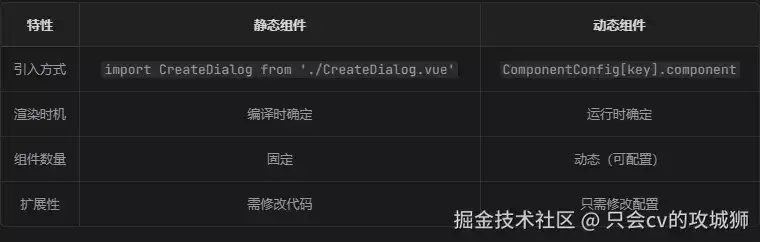
2.2 配置驱动渲染的完整链路
拿"商品管理"这个典型场景来说,完整走一遍从配置到渲染的流程。 **第一步:业务配置(model.js)** 复制代码module.exports = {
model: 'dashboard',
name: '电商系统',
menu: [{
key: 'product',
name: '商品管理',
schemaConfig: {
api: '/api/proj/product',
// 1. Schema 配置:定义字段
schema: {
type: 'object',
properties: {
product_id: {
type: 'string',
label: '商品ID',
tableOptions: { width: 300 },
editFormOptions: { comType: 'input', disabled: true }
},
product_name: {
type: 'string',
label: '商品名称',
tableOptions: { width: 200 },
searchOptions: { comType: 'dynamicSelect', api: '/api/proj/getProductList' },
createFormOptions: { comType: 'input' },
editFormOptions: { comType: 'input' }
},
product_price: {
type: 'number',
label: '商品价格',
tableOptions: { width: 200 },
createFormOptions: { comType: 'inputNumber' },
editFormOptions: { comType: 'inputNumber' }
}
},
required: ['product_name']
},
// 2. 表格配置:定义按钮
tableConfig: {
headerButtons: [{
label: '新增商品',
eventKey: 'showComponent',
eventOptions: { comName: 'createForm' },
type: 'primary'
}],
rowButtons: [{
label: '修改商品',
eventKey: 'showComponent',
eventOptions: { comName: 'editForm' },
type: 'warning'
}, {
label: '删除商品',
eventKey: 'remove',
type: 'danger',
eventOptions: {
params: { product_id: 'schema::product_id' }
}
}]
},
// 3. 组件配置:定义弹窗
componentConfig: {
createForm: {
title: '新增商品',
sa veBtnText: '新增商品'
},
editForm: {
mainKey: 'product_id',
title: '修改商品',
sa veBtnText: '修改商品'
}
}
}
}]
}
**第二步:Schema 构建(schema.js)**
`buildDtoSchema` 方法的核心逻辑是:根据当前场景,按需提取字段配置。
 复制代码const buildDtoSchema = (_schema, comName) => {
    const dotSchema = {
        type: 'object',
        properties: {}
    }

    for (const key in _schema.properties) {
        const props = _schema.properties[key]

        // 只处理有 xxxOptions 的字段
        if (props[`${comName}Options`]) {
            let dtoProps = {}

            // 提取非 Options 属性(type、label、maxLength 等)
            for (const pKey in props) {
                if (pKey.indexOf('Options') < 0) {
                    dtoProps[pKey] = props[pKey]
                }
            }

            // 提取当前场景的 Options
            dtoProps.options = props[`${comName}Options`]

            // 处理 required
            const { required } = _schema
            if (required && required.find(pk => pk === key)) {
                dtoProps.options.required = true
            }

            dotSchema.properties[key] = dtoProps
        }
    }

    return dotSchema
}
举个例子,调用 `buildDtoSchema(schema, 'createForm')` 后,输出的结果中只有 `product_name` 和 `product_price` 这两个有 `createFormOptions` 配置的字段被保留,其他无关字段被自动过滤掉。
 复制代码// 调用:buildDtoSchema(schema, 'createForm')
// 输出:
{
    type: 'object',
    properties: {
        product_name: {
            type: 'string',
            label: '商品名称',
            options: {
                comType: 'input',
                required: true  // 从 required 数组提取
            }
        },
        product_price: {
            type: 'number',
            label: '商品价格',
            options: {
                comType: 'inputNumber'
            }
        }
    }
}
这里有几个设计上的巧思值得关注:
- **一份配置,多场景复用**:`product_name` 同时配置了 `tableOptions`、`searchOptions`、`createFormOptions`、`editFormOptions`,一份配置覆盖所有场景
- **按需提取**:构建表格 schema 时只提取 `tableOptions`,构建表单 schema 时只提取对应的 `createFormOptions`
- **去噪处理**:自动移除其他场景的配置,避免干扰
**第三步:动态渲染(schema-view.vue)**
 复制代码
  <el-row>
    <SearchPanel
      v-if="searchSchema?.properties && Object.keys(searchSchema.properties).length > 0"
      @search="handleSearch"
      @reset="handleReset"
    />

    <TablePanel @operate="onOperate" />


    <component
      v-for="(component, key) in components"
      :key="key"
      :is="ComponentConfig[key]?.component"
      :ref="(el) => { if (el) comMapRef[key] = el }"
      @command="handleCommand"
    />
  el-row>
<script setup>
import ComponentConfig from './components/component-config.js'
import { useSchema } from './hook/schema.js'
import { provide, ref } from 'vue'const comMapRef = ref({})
const { api, tableConfig, tableSchema, searchSchema, searchConfig, components } = useSchema()// 通过 provide 下发配置
provide('schemaViewData', {
    api, tableConfig, tableSchema,
    searchSchema, searchConfig, components
})// 事件处理
const onOperate = ({ btnConfig, rowData }) => {
    const { eventKey } = btnConfig
    if (EventHandlerMap[eventKey]) {
        EventHandlerMap[eventKey]({ btnConfig, rowData })
    }
}
script>
**第四步:组件注册(component-config.js)**
 复制代码import CreateForm from './create-form/create-form.vue'
import EditForm from './edit-form/edit-form.vue'const ComponentConfig = {
    createForm: { component: CreateForm },
    editForm: { component: EditForm }
}export default ComponentConfig
整个渲染流程梳理下来,就是这样的:
 复制代码components = {
    createForm: { schema: {...}, config: {...} },
    editForm: { schema: {...}, config: {...} }
}
    ↓ v-for 遍历
"ComponentConfig['createForm']?.component" />
    ↓ 解析
ComponentConfig['createForm'].component = CreateForm
    ↓ 渲染
<CreateForm /> 组件实例
三、设计模式深度解析
3.1 策略模式
策略模式的定义是:定义一系列算法,把它们一个个封装起来,并且使它们可以相互替换。听起来有点抽象,但看代码就直观了。 在本项目中,事件处理就是一个典型的策略模式应用: 复制代码// 事件处理策略映射表
const EventHandlerMap = {
showComponent: showComponent, // 策略1:显示组件
remove: removeData, // 策略2:删除数据
export: exportData, // 策略3:导出数据(可扩展)
import: importData // 策略4:导入数据(可扩展)
}// 根据 eventKey 选择策略
const onOperate = ({ btnConfig, rowData }) => {
const { eventKey } = btnConfig
// 传统方式:大量 if-else
// if (eventKey === 'showComponent') { ... }
// else if (eventKey === 'remove') { ... }
// else if (eventKey === 'export') { ... }
// 策略模式:一行代码
if (EventHandlerMap[eventKey]) {
EventHandlerMap[eventKey]({ btnConfig, rowData })
}
}
这种做法的好处很明显:
1. 消除条件分支:用映射表替代 if-else,代码更清晰
2. 符合开闭原则:新增策略只需添加映射项,不修改现有代码
3. 易于测试:每个策略独立,可单独测试
4. 运行时切换:可以根据配置动态选择策略
3.2 工厂模式
工厂模式的定义:定义一个用于创建对象的接口,让子类决定实例化哪一个类。在本项目中,`ComponentConfig` 就是一个组件工厂。 复制代码// 组件工厂
const ComponentConfig = {
createForm: { component: CreateForm },
editForm: { component: EditForm },
detailDrawer: { component: DetailDrawer },
importDialog: { component: ImportDialog }
}// 根据 key 生产组件实例
"ComponentConfig[key]?.component" />
工厂模式的优势在于:
1. 封装创建逻辑:业务层只需知道 key,不需要知道组件实现
2. 统一管理:所有组件注册在一个地方,便于维护
3. 延迟创建:只在需要时才创建组件实例
4. 易于替换:修改工厂配置即可替换组件实现
对比一下传统方式和工厂模式,差距一目了然:
 复制代码
<template>
  <CreateForm v-if="showCreate" />
  <EditForm v-if="showEdit" />
  <DetailDrawer v-if="showDetail" />
template><script setup>
import CreateForm from './CreateForm.vue'
import EditForm from './EditForm.vue'
import DetailDrawer from './DetailDrawer.vue'const showCreate = ref(false)
const showEdit = ref(false)
const showDetail = ref(false)
script>
<template>
  <component
    v-for="(component, key) in components"
    :is="ComponentConfig[key]?.component"
  />
template><script setup>
// 无需 import 具体组件,工厂统一管理
script>
3.3 观察者模式
观察者模式定义了一种一对多的依赖关系,当一个对象状态发生改变时,所有依赖它的对象都会得到通知。在本项目中,子组件通过 `emit` 通知父组件,就是典型的观察者模式。 复制代码// 子组件触发事件
const submit = async () => {
// 提交逻辑...
// 通知父组件
emit('command', {
event: 'loadTableData'
})
}// 父组件监听事件
"ComponentConfig[key]?.component"
@command="handleCommand"
/>const handleCommand = (data) => {
const { event } = data
if (event === 'loadTableData') {
tablePanelRef.value.loadTableData()
}
}
观察者模式的优势:
1. 解耦:子组件不需要知道父组件的具体实现
2. 灵活性:父组件可以选择性监听事件
3. 可扩展:新增事件类型不影响现有代码
来看一个完整的事件流转链路,从用户点击按钮到弹窗弹出:
 复制代码用户点击"新增商品"按钮
    ↓
table-panel.vue: operationHandler({ btnConfig })
    ↓
emit('operate', { btnConfig })
    ↓
schema-view.vue: onOperate({ btnConfig })
    ↓
EventHandlerMap['showComponent']({ btnConfig })
    ↓
showComponent({ btnConfig })
    ↓
comMapRef['createForm'].show()
    ↓
create-form.vue: isShow.value = true
    ↓
el-drawer 弹出
3.4 组合模式
组合模式将对象组合成树形结构以表示"部分-整体"的层次结构。在本项目中,多个组件通过 `v-for` 统一渲染,就是组合模式的体现。 复制代码// 组件组合
components = {
createForm: {
schema: { ... }, // 表单 schema
config: { ... } // 组件配置
},
editForm: {
schema: { ... },
config: { ... }
}
}// 递归渲染
for="(component, key) in components"
:is="ComponentConfig[key]?.component"
/>
组合模式的优势:
1. 统一处理:单个组件和组件集合使用相同的方式处理
2. 易于扩展:可以动态添加新的组件组合
3. 简化客户端代码:不需要区分单个对象和组合对象
四、数据流设计详解
4.1 Provide/Inject 跨层级通信
如果通过 props 传递数据,层层传递(props drilling)的问题会非常头疼: 复制代码
<SchemaView :config="config">
<TablePanel :config="config">
<SchemaTable :config="config" />
TablePanel>
<CreateForm :config="config" />
SchemaView>
解决方案是使用 Vue 的 Provide/Inject 机制:
 复制代码// schema-view.vue - 提供数据
provide('schemaViewData', {
    api, tableConfig, tableSchema,
    searchSchema, searchConfig, components
})// table-panel.vue - 注入数据
const { api, tableSchema, tableConfig } = inject('schemaViewData')// create-form.vue - 注入数据
const { api, components } = inject('schemaViewData')
优势很明显:
- 避免 props drilling
- 数据源单一,便于维护
- 组件解耦,便于复用
4.2 数据流向图
 复制代码┌─────────────────────────────────────────────────────────┐
│                    model.js (配置层)                      │
│  schema: { product_name: { tableOptions, createFormOptions } } │
│  tableConfig: { headerButtons, rowButtons }              │
│  componentConfig: { createForm: { title, sa veBtnText } } │
└────────────────────┬────────────────────────────────────┘
                     │
                     ↓
┌─────────────────────────────────────────────────────────┐
│                 schema.js (构建层)                        │
│  buildDtoSchema(schema, 'table') → tableSchema           │
│  buildDtoSchema(schema, 'createForm') → createFormSchema │
│  components = { createForm: { schema, config } }         │
└────────────────────┬────────────────────────────────────┘
                     │
                     ↓
┌─────────────────────────────────────────────────────────┐
│              schema-view.vue (调度层)                     │
│  provide('schemaViewData', { api, tableSchema, components }) │
│  EventHandlerMap = { showComponent, remove }             │
└────────────────────┬────────────────────────────────────┘
                     │
          ┌──────────┴──────────┐
          ↓                     ↓
┌──────────────────┐   ┌──────────────────┐
│ table-panel.vue  │   │ create-form.vue  │
│ inject 数据      │   │ inject 数据      │
│ 渲染表格         │   │ 渲染表单         │
│ emit('operate')  │   │ emit('command')  │
└──────────────────┘   └──────────────────┘
4.3 事件通信机制
事件冒泡链路的完整流程: 复制代码// 1. schema-table.vue - 表格行按钮点击
const operationHandler = ({ btnConfig, rowData }) => {
emit('operate', { btnConfig, rowData })
}// 2. table-panel.vue - 转发事件
const operationHandler = ({ btnConfig, rowData }) => {
const { eventKey } = btnConfig
// 本地处理(如删除)
if (EventHandlerMap[eventKey]) {
EventHandlerMap[eventKey]({ btnConfig, rowData })
} else {
// 向上冒泡(如显示组件)
emit('operate', { btnConfig, rowData })
}
}// 3. schema-view.vue - 最终处理
const onOperate = ({ btnConfig, rowData }) => {
const { eventKey } = btnConfig
if (EventHandlerMap[eventKey]) {
EventHandlerMap[eventKey]({ btnConfig, rowData })
}
}
五、实际案例:商品管理的完整实现
5.1 配置定义
 复制代码// model.js
module.exports = {
    menu: [{
        key: 'product',
        name: '商品管理',
        schemaConfig: {
            api: '/api/proj/product',

            schema: {
                type: 'object',
                properties: {
                    product_id: {
                        type: 'string',
                        label: '商品ID',
                        tableOptions: { width: 300, 'show-overflow-tooltip': true },
                        editFormOptions: { comType: 'input', disabled: true }
                    },
                    product_name: {
                        type: 'string',
                        label: '商品名称',
                        tableOptions: { width: 200 },
                        searchOptions: {
                            comType: 'dynamicSelect',
                            api: '/api/proj/getProductList',
                            default: -1
                        },
                        createFormOptions: { comType: 'input' },
                        editFormOptions: { comType: 'input' }
                    },
                    product_price: {
                        type: 'number',
                        label: '商品价格',
                        tableOptions: { width: 200 },
                        createFormOptions: { comType: 'inputNumber' },
                        editFormOptions: { comType: 'inputNumber' }
                    },
                    product_stock: {
                        type: 'number',
                        label: '商品库存',
                        tableOptions: { width: 200 },
                        searchOptions: { comType: 'input' },
                        createFormOptions: {
                            comType: 'select',
                            enumList: [
                                { value: 1, label: '100件' },
                                { value: 2, label: '200件' }
                            ]
                        }
                    },
                    create_time: {
                        type: 'string',
                        label: '创建时间',
                        tableOptions: {},
                        searchOptions: { comType: 'dateRange' }
                    }
                },
                required: ['product_name']
            },

            tableConfig: {
                headerButtons: [{
                    label: '新增商品',
                    eventKey: 'showComponent',
                    eventOptions: { comName: 'createForm' },
                    type: 'primary',
                    plain: true
                }],
                rowButtons: [{
                    label: '修改商品',
                    eventKey: 'showComponent',
                    eventOptions: { comName: 'editForm' },
                    type: 'warning',
                    plain: true
                }, {
                    label: '删除商品',
                    eventKey: 'remove',
                    type: 'danger',
                    plain: true,
                    eventOptions: {
                        params: { product_id: 'schema::product_id' }
                    }
                }]
            },

            componentConfig: {
                createForm: {
                    title: '新增商品',
                    sa veBtnText: '新增商品'
                },
                editForm: {
                    mainKey: 'product_id',
                    title: '修改商品',
                    sa veBtnText: '修改商品'
                }
            }
        }
    }]
}
5.2 Schema 构建过程
 复制代码// 构建表格 schema
buildDtoSchema(schema, 'table')
// 输出:
{
    type: 'object',
    properties: {
        product_id: {
            type: 'string',
            label: '商品ID',
            options: { width: 300, 'show-overflow-tooltip': true }
        },
        product_name: {
            type: 'string',
            label: '商品名称',
            options: { width: 200 }
        },
        product_price: {
            type: 'number',
            label: '商品价格',
            options: { width: 200 }
        },
        product_stock: {
            type: 'number',
            label: '商品库存',
            options: { width: 200 }
        },
        create_time: {
            type: 'string',
            label: '创建时间',
            options: {}
        }
    }
}// 构建搜索 schema
buildDtoSchema(schema, 'search')
// 输出:
{
    type: 'object',
    properties: {
        product_name: {
            type: 'string',
            label: '商品名称',
            options: {
                comType: 'dynamicSelect',
                api: '/api/proj/getProductList',
                default: -1
            }
        },
        product_price: {
            type: 'number',
            label: '商品价格',
            options: {
                comType: 'select',
                enumList: [...]
            }
        },
        product_stock: {
            type: 'number',
            label: '商品库存',
            options: { comType: 'input' }
        },
        create_time: {
            type: 'string',
            label: '创建时间',
            options: { comType: 'dateRange' }
        }
    }
}// 构建新增表单 schema
buildDtoSchema(schema, 'createForm')
// 输出:
{
    type: 'object',
    properties: {
        product_name: {
            type: 'string',
            label: '商品名称',
            options: {
                comType: 'input',
                required: true  // 从 required 数组提取
            }
        },
        product_price: {
            type: 'number',
            label: '商品价格',
            options: { comType: 'inputNumber' }
        },
        product_stock: {
            type: 'number',
            label: '商品库存',
            options: {
                comType: 'select',
                enumList: [...]
            }
        }
    }
}
5.3 事件处理流程
场景1:点击"新增商品" 复制代码1. 用户点击表格头部"新增商品"按钮
↓
2. table-panel.vue: operationHandler({ btnConfig })
btnConfig = {
label: '新增商品',
eventKey: 'showComponent',
eventOptions: { comName: 'createForm' }
}
↓
3. table-panel.vue: EventHandlerMap['showComponent'] 不存在
↓
4. table-panel.vue: emit('operate', { btnConfig })
↓
5. schema-view.vue: onOperate({ btnConfig })
↓
6. schema-view.vue: EventHandlerMap['showComponent']({ btnConfig })
↓
7. schema-view.vue: showComponent({ btnConfig })
comName = 'createForm'
comRef = comMapRef.value['createForm']
↓
8. schema-view.vue: comRef.show()
↓
9. create-form.vue: show()
isShow.value = true
↓
10. el-drawer 弹出
六、总结
6.1 核心思想
动态组件架构的核心思想,说白了就是两句话:**配置驱动 + 事件驱动**。 - 配置驱动:通过 `componentConfig` 和 `schema` 描述"要什么" - 事件驱动:通过 `EventHandlerMap` 和 `emit` 描述"做什么" - 动态渲染:通过 `6.2 设计优势
1. 高度灵活:新增功能只需添加配置,无需修改组件代码 2. 易于扩展:符合开闭原则,支持插件化扩展 3. 降低耦合:组件间通过事件和配置通信,互不依赖 4. 提高复用:通用组件通过配置适配不同业务场景 5. 便于维护:配置集中管理,逻辑清晰6.3 适用场景
- 中后台管理系统 - CRUD 密集型应用 - 表单密集型应用 - 需要高度可配置的系统 当然,它也有自己的边界。交互复杂、高度定制化的 C 端应用,就不太适合这种架构了。选对场景,才能发挥出动态组件的真正价值。
游乐网为非赢利性网站,所展示的游戏/软件/文章内容均来自于互联网或第三方用户上传分享,版权归原作者所有,本站不承担相应法律责任。如您发现有涉嫌抄袭侵权的内容,请联系youleyoucom@outlook.com。
 同类文章
同类文章

DOM中文本元素层级路径的精准定位方法
通过向上遍历至首个带id的祖先节点,同时记录每层子索引,构建唯一可复现的层级路径,可精确定位任意右键点击的文本元素在页面中的结构位置,该方案将DOM定位转化为树路径问题,性能稳定且适用于复杂嵌套结构。

Tailwind CSS响应式断点原理与文本尺寸类正确使用顺序
TailwindCSS的响应式前缀基于min-width媒体查询,采用移动优先策略。无前缀类默认所有尺寸生效,带前缀类在达到对应断点后增强覆盖。正确写法应从小到大依次排列,避免大屏变小,确保移动端优先,逐步适配更大屏幕,断点尺寸依次递增。

Nuxt 3/Vue 3 v-for列表删除后UI状态错乱解决方案
在Nuxt3 Vue3中,v-for列表删除后UI状态错乱源于将数组索引作为key,导致DOM节点复用。正确做法是为每项数据赋予稳定唯一的id作为key,并确保key绑定在v-for所在元素上,避免使用索引,从而保证UI与数据同步。

独立控制每个可展开区域的展开折叠状态
在React中为多个同类型可展开区域实现独立开关控制,核心是将状态粒度从组件级下放到每个条目级,通过自定义Hook封装状态逻辑,使用唯一标识符而非数组索引管理展开状态,避免全局状态导致同步开闭,支持展开、收起和切换方法。

Ant Design自定义CSS主题编译耗时优化方案
AntDesign自定义CSS主题编译慢的根源是Webpack每次完整解析整个index less。解决方法包括:配置less-loader缓存目录、modifyVars仅传需覆盖变量、避免动态@import路径、禁用cssinjs、主题变量通过构建时注入而非运行时计算,并同步更新alias less。


- 热门数据榜


 相关攻略
相关攻略
 2026-07-20 06:56
2026-07-20 06:55
2026-07-20 06:55
2026-07-20 06:55
2026-07-20 06:55
2026-07-20 06:55
2026-07-20 06:54
2026-07-20 06:54
热门教程
2026-07-20 06:56
2026-07-20 06:55
2026-07-20 06:55
2026-07-20 06:55
2026-07-20 06:55
2026-07-20 06:55
2026-07-20 06:54
2026-07-20 06:54
热门教程
- 游戏攻略
- 安卓教程
- 苹果教程
- 电脑教程


