MySQL数据库基本查询原理与实战指南详解教程

熟练掌握数据库的创建、查询、插入、更新、删除基本操作,学会查询指定列、所有列、设置别名、去重,使用算术表达式、条件筛选、比较与逻辑运算符、范围与模糊查询,通过排序、分页,完成数据检索、更新与删除等操作。
本文旨在帮助读者系统掌握 create、select 的核心用法,学会查询指定列、全列、设置别名,利用 distinct 去重,在查询中使用算术表达式进行数据计算,通过 where 子句实现条件筛选,熟悉比较运算符、逻辑运算符、范围查询与模糊查询,还能运用 order by 排序、limit 分页,最终能够组合多种条件完成高效的数据检索。下面从表的增删改查开始,逐步将这些技能串联起来。
一.表的增删改查
1.创建操作
1.1.create-创建表
基本语法:
create table [if not exists] 表名( 字段名 数据类型 字段约束, 字段名 数据类型 字段约束);
举个例子:
CREATE TABLE students ( id int unsigned primary key auto_increment, sn int not null unique comment '学号', name varchar(20) not null, qq varchar(20));
1.2.insert-插入
<1>.单行数据 + 全列插入
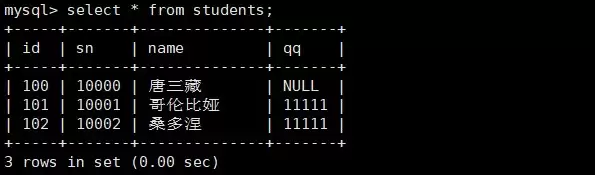
插入两条记录时,value_list 数量必须和定义表的列的数量及顺序一致。注意,此时也可以不指定 id(当然,若指定则需明确插入数据到哪些列),MySQL 会使用默认值自动递增。
操作:
insert into students values (100, 10000, '唐三藏', null);insert into students values (101, 10001, '哥伦比娅', '11111');mysql> insert into students values (102, 10002, '桑多涅', '11111');
用 select 查看插入结果,效果如下:
<2>.多行数据 + 指定列插入
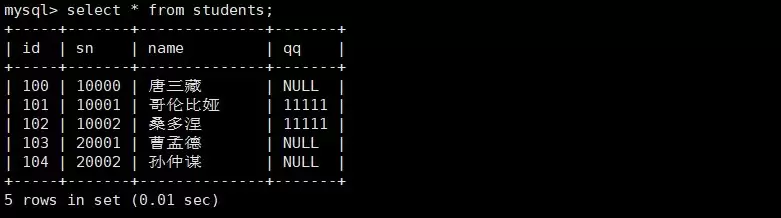
插入两条记录,value_list 数量必须和指定列数量及顺序一致。
insert into students (id, sn, name) values (103, 20001, '曹孟德'),(104, 20002, '孙仲谋');
查看结果:
<3>.插入后检查是否更新
当 主键/唯一键 对应的值已经存在而导致插入失败时,我们可以选择性地进行同步更新操作。语法如下:
insert into 表名 [(字段列表)] values (值列表) on duplicate key update 字段名1 = 新值1,字段名2 = 新值2,...;
例如:
insert into students (id,sn,name) values (100,10010,'唐大师')on duplicate key update sn=10010,name='唐大师';
结果:

这时候可能有人会好奇:这个 2 rows affected 是什么意思?
- 0 row affected:表中有冲突数据,但冲突数据的值和 update 的值相等。
- 1 row affected:表中没有冲突数据,数据被插入。
- 2 row affected:表中有冲突数据,并且数据已经被更新。
通过 MySQL 函数获取受影响的数据行数:
select count();
结果:

1.3.replace-替换
语法:
replace [into] 表名 [(字段名列表)] values (值列表) [, (值列表)] ...;
示例:
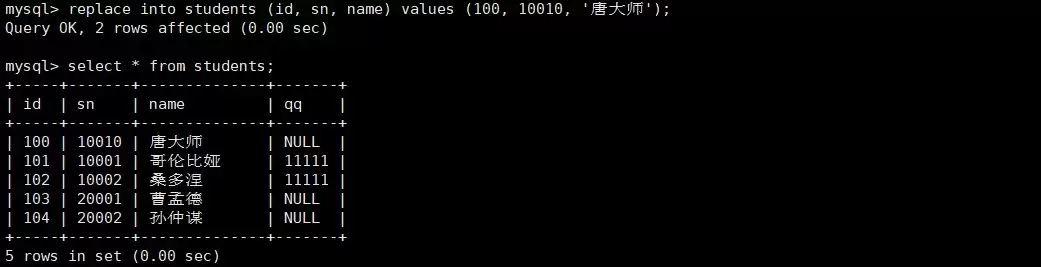
replace into students (id, sn, name) values (100, 10010, '唐大师');
结果:
执行逻辑:
- 如果不存在主键或唯一键冲突,则直接插入数据。
- 如果存在主键或唯一键冲突,则先删除原来的记录,再插入新的记录。
解释一下这里的受影响行数:
1 row affected:没有发生冲突,直接插入一条新记录。2 rows affected:与一条旧记录发生冲突,先删除一条,再插入一条。3 rows affected:新数据同时与两条不同的旧记录发生唯一键冲突,删除两条,再插入一条。
计算方式:受影响行数 = 删除的旧记录数量 + 插入的新记录数量。
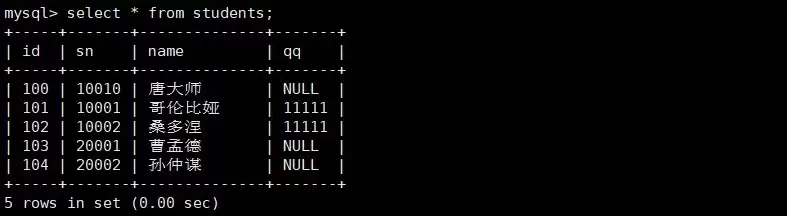
再看一个例子。这是之前的 students:
如果我们故意插入一个 id 为 102 的数据呢?
replace into students (id, sn, name) values (102, 10010, '唐大师');
插入后的 students:
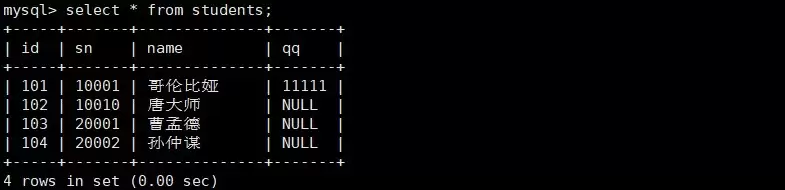
可以看出,之前 id 为 102 的数据已经被删除,并在原位置插入了新数据。
2.查询操作
先创建表结构:
create table exam_result ( id int unsigned primary key auto_increment, name varchar(20) not null comment '同学姓名', chinese float default 0.0 comment '语文成绩', math float default 0.0 comment '数学成绩', english float default 0.0 comment '英语成绩');
插入测试数据:
insert into exam_result (name, chinese, math, english) values ('唐三藏', 67, 98, 56), ('孙悟空', 87, 78, 77), ('猪悟能', 88, 98, 90), ('曹孟德', 82, 84, 67), ('刘玄德', 55, 85, 45), ('孙权', 70, 73, 78), ('宋公明', 75, 65, 30);
2.1.select-查询
<1>.全列查询
通常情况下不建议使用 * 进行全列查询,原因有二:
- 查询的列越多,需要传输的数据量越大;
- 可能会影响到索引的使用。
操作:
select * from exam_result;
结果:
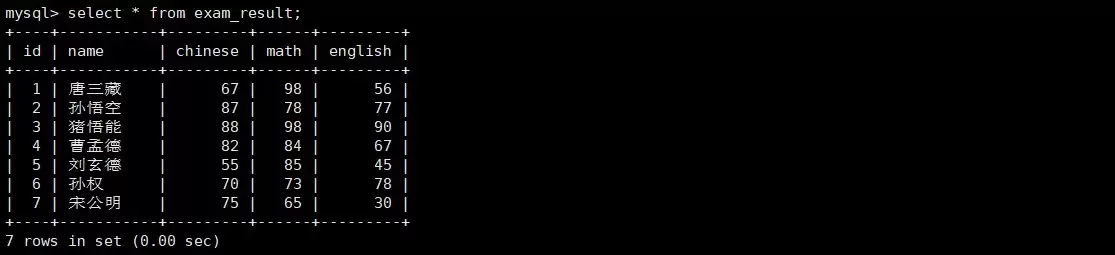
<2>.指定列查询
查询时,指定列的顺序不需要按定义表的顺序来。
select id, name, english FROM exam_result;
结果:
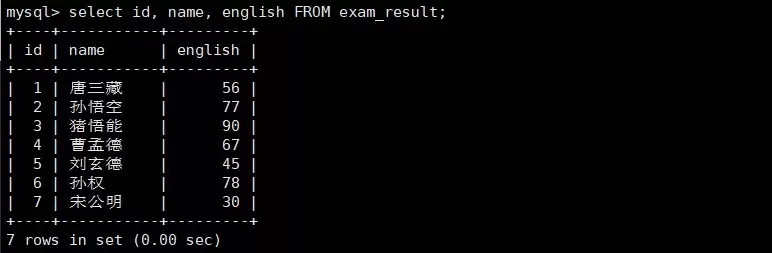
<3>.查询字段为表达式
表达式不包含字段时:

表达式包含多个字段:
<4>.为查询结果指定别名
语法:
SELECT column [AS] alias_name(别名) [...] FROM table_name;
操作:
select id, name, chinese + math + english 总分 from exam_result;
结果:
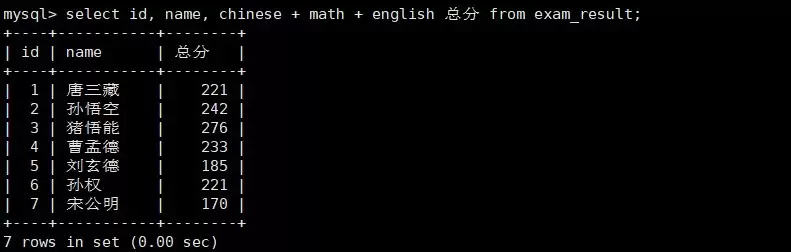
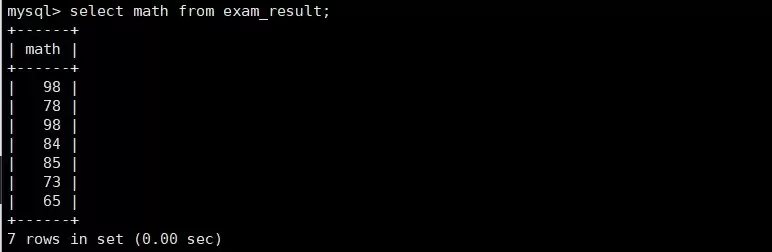
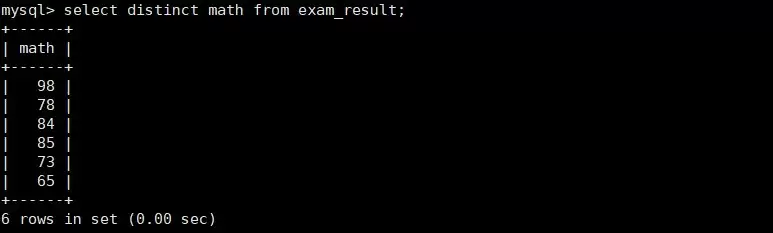
<5>.结果去重
distinct 用于去除查询结果中完全重复的记录。
基本语法:
select distinct 字段列表 from 表名;
操作:
select distinct math from exam_result;
2.2.where条件
2.2.1.运算符
<1>.比较运算符:
| 运算符 | 说明 |
| >, >=, <, <= | 大于,大于等于,小于,小于等于 |
| = | 等于,NULL 不安全,例如 NULL = NULL 的结果是 NULL |
| <=> | 等于,NULL 安全,例如 NULL NULL 的结果是 TRUE(1) |
| !=, <> | 不等于 |
| between a0 and a1 | 范围匹配,[a0, a1],如果 a0 <= value <= a1,返回 TRUE(1) |
| IN (option, ...) | 如果是 option 中的任意一个,返回 TRUE(1) |
| is null | 是null |
| is not null | 不是 null |
| like | 模糊匹配。% 表示任意多个(包括 0 个)任意字符;_ 表示任意一个字符 |
<2>.逻辑运算符:
| 运算符 | 说明 |
| and | 多个条件必须都为 TRUE(1),结果才是 TRUE(1) |
| or | 任意一个条件为 TRUE(1), 结果为 TRUE(1) |
| not | 条件为 TRUE(1),结果为 FALSE(0) |
2.2.2.案例演示
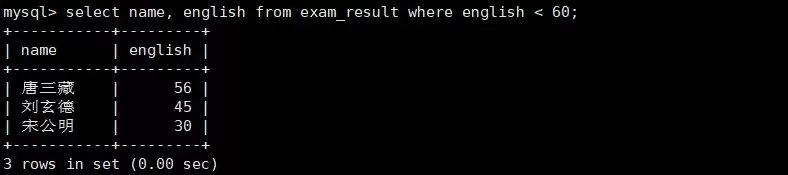
<1>.英语不及格的同学及英语成绩 (< 60):
SELECT name, english FROM exam_result WHERE english < 60;
结果:
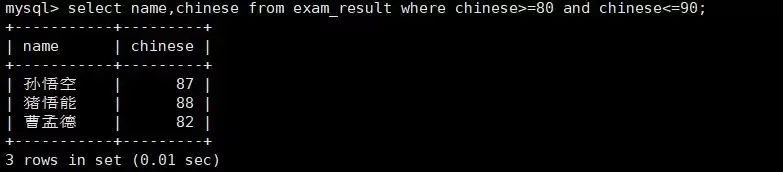
<2>.语文成绩在 [80, 90] 分的同学及语文成绩,需要用 and 做连接:
select name,chinese from exam_result where chinese>=80 and chinese<=90;
结果:
当然也可以用 between...and...:
select name,chinese from exam_result where chinese between 80 and 90;
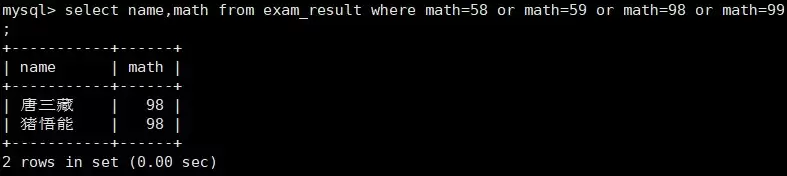
<3>.数学成绩是 58、59、98 或 99 分的同学及数学成绩,可以用 or 连接:
select name,math from exam_result where math=58 or math=59 or math=98 or math=99;
结果:
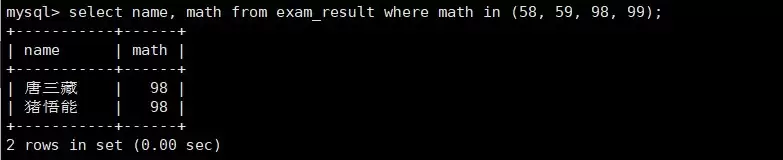
也可以用 in 条件:
select name, math from exam_result where math in (58, 59, 98, 99);
结果:
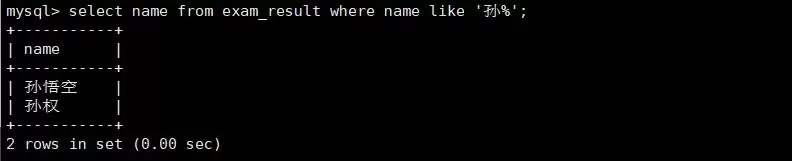
<4>.姓孙的同学及孙某同学
% 匹配任意多个(包括 0 个)任意字符:
select name from exam_result where name like '孙%';
结果:
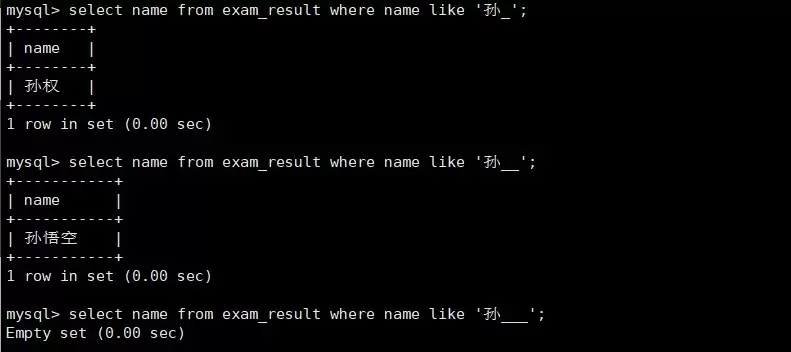
_ 匹配严格的一个任意字符,可以添加多个 _:
select name from exam_result where name like '孙_';select name from exam_result where name like '孙__';select name from exam_result where name like '孙___';
结果:
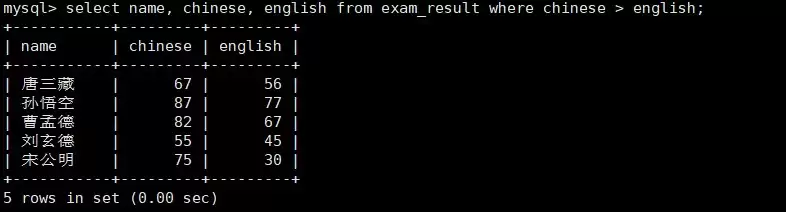
<5>.语文成绩好于英语成绩的同学
where 条件中比较运算符两侧都是字段:
select name, chinese, english from exam_result where chinese > english;
结果:
<6>.总分在 200 分以下的同学
可以在 WHERE 条件中使用表达式:
select name, chinese + math + english 总分 from exam_result where 总分 <200;
报错的原因是:总分 是通过 select 设置的别名,而 where 的执行早于 select。执行 where 时,总分 这个别名还没有产生,所以 MySQL 认为它是一个不存在的字段。修改后的正确写法:
select name, chinese + math + english 总分 from exam_result where chinese+math+english <200;
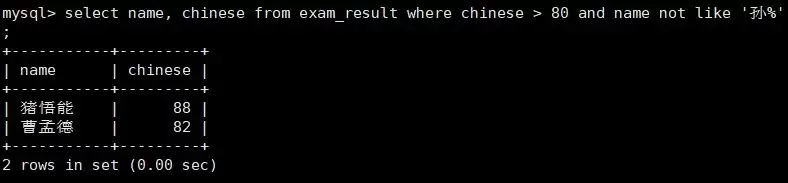
<7>.语文成绩 > 80 并且不姓孙的同学
这里用到 and 与 not:
select name, chinese from exam_result where chinese > 80 and name not like '孙%';
结果:
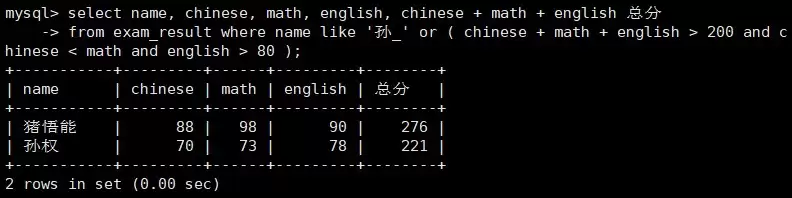
<8>.孙某同学,否则要求总成绩 > 200 并且 语文成绩 < 数学成绩并且英语成绩 > 80
select name, chinese, math, english, chinese + math + english 总分 from exam_result where name like '孙_' or ( chinese + math + english > 200 and chinese < math and english > 80 );
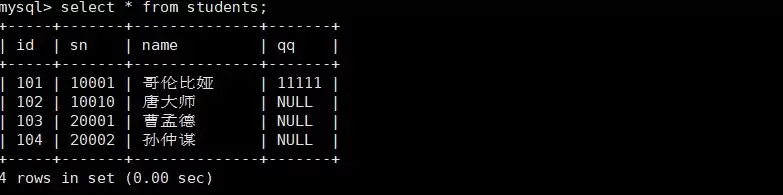
2.2.3.NULL 的查询
查询 students 表:
查询 qq 号已知的同学姓名:
select name,qq from students where qq is not null;
结果:

<1>.NULL 和 NULL 的比较,= 和 <=> 的区别
在 MySQL 中,null 表示“未知值”,不是普通的数据。因此,不能使用普通的 = 判断两个 null 是否相等。
1. 使用 =
select null = null;
结果:
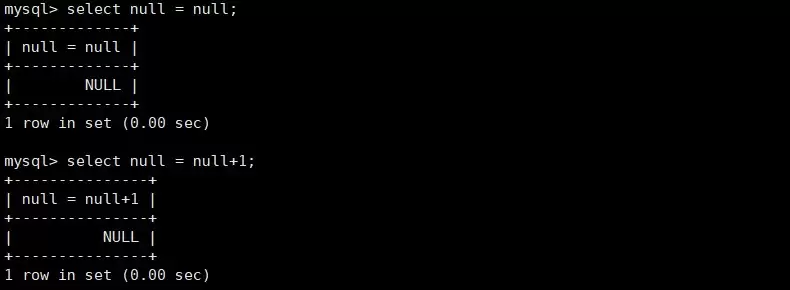
因为两个未知值无法判断是否相等,所以结果既不是 true(1),也不是 false(0),而是 null。下面的结果也都是 null:
select null = 10;select null != 10;select null <> 10;
2. 使用 <=>
<=> 是 MySQL 提供的 null 安全等于运算符。
select null <=> null;select null <=> 10;
结果:
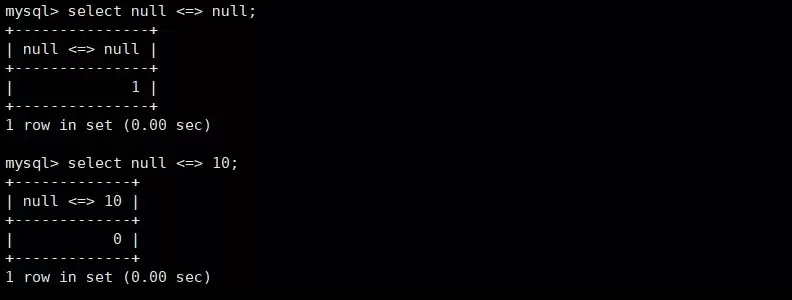
2.3.结果排序
MySQL 使用 order by 对查询结果进行排序。
基本语法:
select 字段列表 from 表名 [where 筛选条件] order by 排序字段 [asc | desc];
注意:asc 为升序(从小到大),desc 为降序(从大到小),默认为 asc。
<1>.同学及数学成绩,按数学成绩升序显示
select math from exam_result order by math;select math from exam_result order by math desc;
结果:
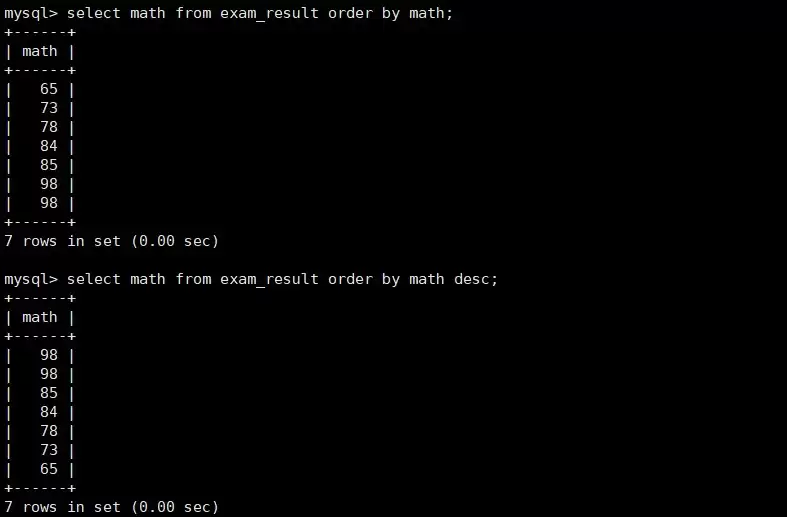
<2>.同学及 qq 号,按 qq 号排序显示
select name, qq from students order by qq;
结果:
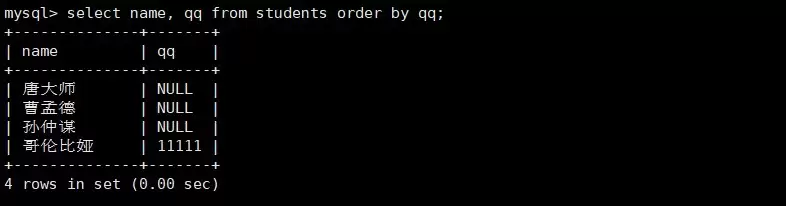
注意:NULL 视为比任何值都小,升序时出现在最上面。
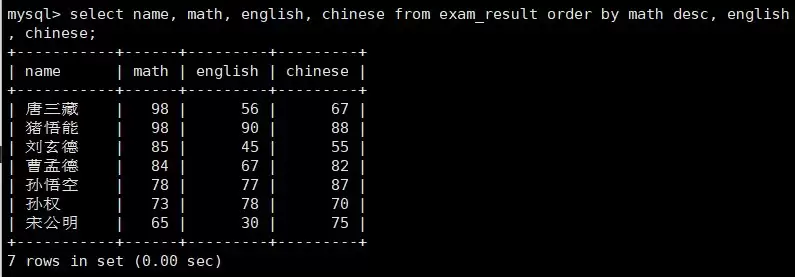
<3>.查询同学各门成绩,依次按数学降序、英语升序、语文升序的方式显示
select name, math, english, chinese from exam_result order by math desc, english, chinese;
<4>.查询同学及总分,由高到低
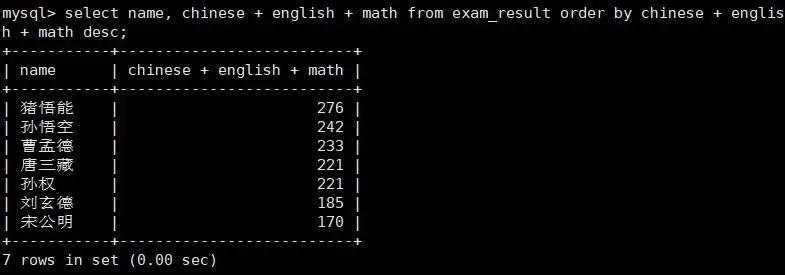
order by 中可以使用表达式:
select name, chinese + english + math from exam_result order by chinese + english + math desc;
order by 子句中也可以使用列别名:
select name, chinese + english + math 总分 from exam_result order by 总分 desc;
结果:
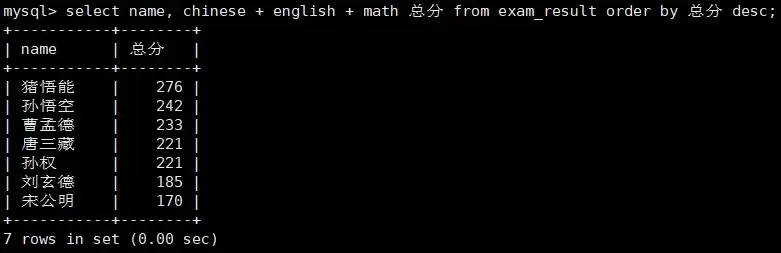
为什么可以使用别名?因为执行顺序是:
from exam_result ↓select name, chinese + english + math 总分 ↓order by 总分 desc ↓返回排序后的结果
执行 order by 时,select 已经产生了 总分 别名,所以可以直接使用。
<5>.查询姓孙的同学或者姓曹的同学数学成绩,结果按数学成绩由高到低显示
select name,math from exam_result where name like '孙%' or name like '曹%' order by math desc;
结果:

2.4.筛选
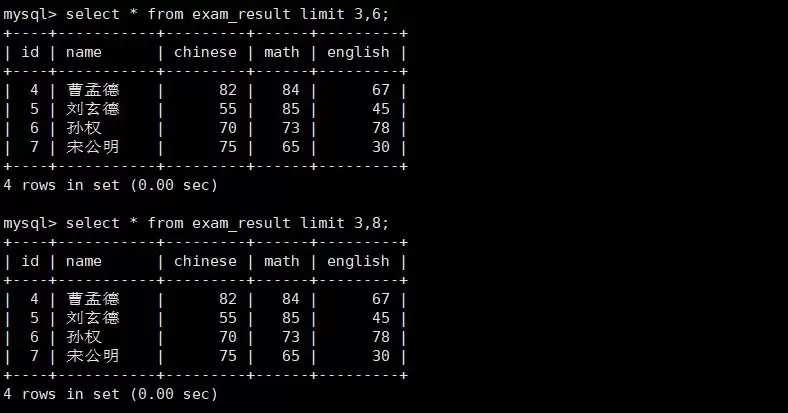
语法:
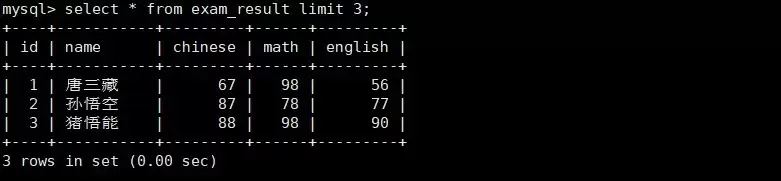
起始下标为 0 -- 从 0 开始,筛选 n 条结果SELECT ... FROM table_name [WHERE ...] [ORDER BY ...] LIMIT n; 从 s 开始,筛选 n 条结果 SELECT ... FROM table_name [WHERE ...] [ORDER BY ...] LIMIT s, n; 从 s 开始,筛选 n 条结果,比第二种用法更明确,建议使用 SELECT ... FROM table_name [WHERE ...] [ORDER BY ...] LIMIT n OFFSET s;
操作:
select * from exam_result limit 3;
select * from exam_result limit 3,6;select * from exam_result limit 3,8;
select * from exam_result limit 3 offset 5;

3.更新操作
3.1.update
update 用于修改表中已经存在的数据。
基本语法:
update 表名 set 字段名1 = 新值1,字段名2 = 新值2,... [where 筛选条件] [order by 排序字段] [limit 更新数量];
3.2.实例
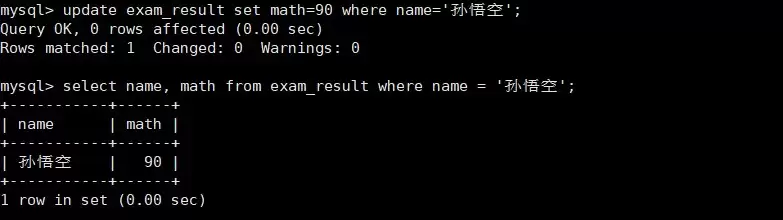
<1>.将孙悟空同学的数学成绩变更为 90 分
先查看原数据:
select name, math from exam_result where name = '孙悟空';

进行更新操作:
update exam_result set math=90 where name='孙悟空';
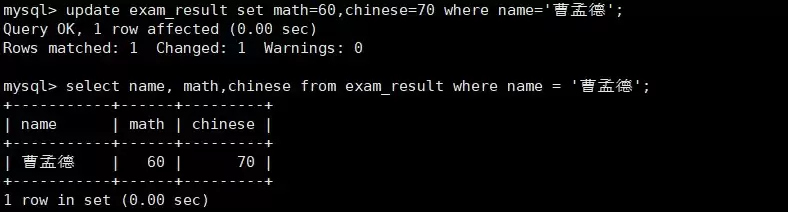
<2>.将曹孟德同学的数学成绩变更为 60 分,语文成绩变更为 70 分
update exam_result set math=60,chinese=70 where name='曹孟德';select name, math,chinese from exam_result where name = '曹孟德';
结果:
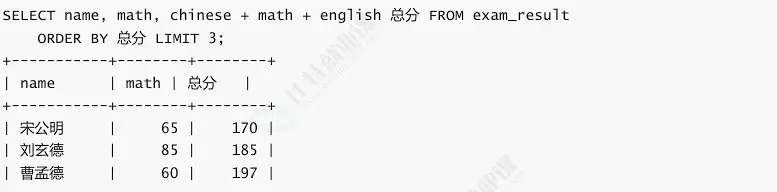
<3>.将总成绩倒数前三的 3 位同学的数学成绩加上 30 分
先查询表数据:
select name, math, chinese + math + english 总分 from exam_result order by 总分 limit 3;
update exam_result set math=math+30 order by math+chinese+english limit 3;
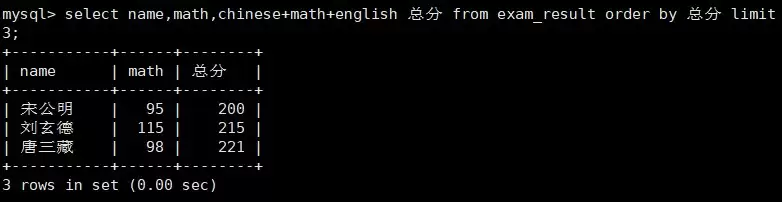
注意:MySQL 不支持 math += 30 这种语法。
<4>.将所有同学的语文成绩更新为原来的 2 倍
注意:更新全表的语句要慎用!!!
查看原数据:
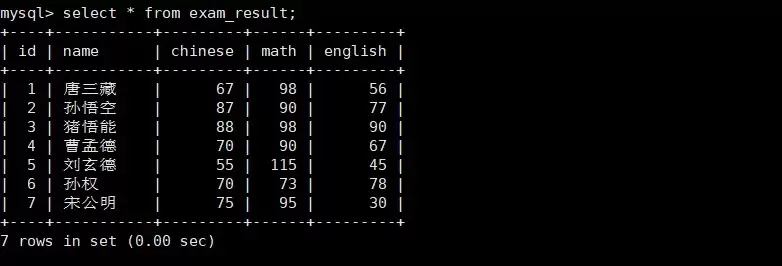
update exam_result set chinese=chinese*2;
4.删除操作
注意:删除表数据的操作要慎用。
4.1.delete
基本语法
delete from 表名 [where 筛选条件] [order by 排序字段] [limit 删除数量];
<1>.例如删除孙悟空同学的考试成绩:
select name from exam_result where name='孙悟空';

delete from exam_result where name = '孙悟空';select name from exam_result where name='孙悟空';

<2>.删除整张表数据
准备测试表:
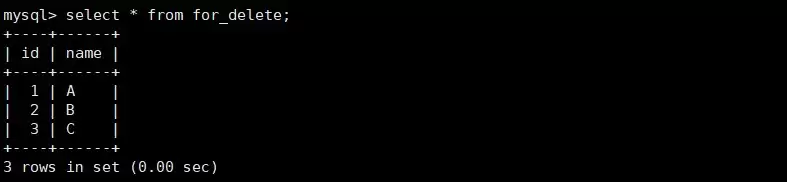
create table for_delete(id int primary key auto_increment, name varchar(20));
插入测试数据:
insert into for_delete (name) values ('A'), ('B'), ('C');
查看测试数据:
删除整表数据:
delete from for_delete;

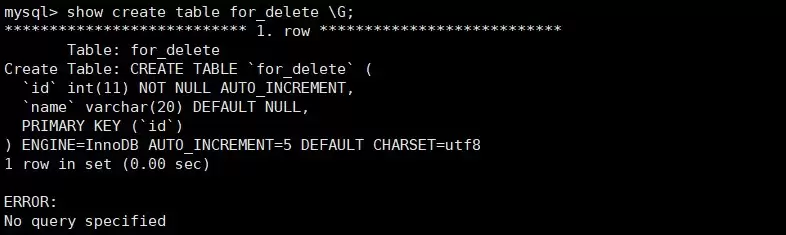
查看删除结果,可以看出表中的数据都被删除了,但是表没有被删除。再插入一条数据,自增 id 在原值上增长:
insert into for_delete (name) values ('D');

查看表结构,会有 auto_increment=n 项:
4.2.截断表
语法:
truncate [table] table_name;
准备测试表、插入测试数据、查看测试数据:
create table for_truncate(id int primary key auto_increment,name varchar(20));insert into for_truncate (name) values ('A'),('B'),('C');select * from for_truncate;
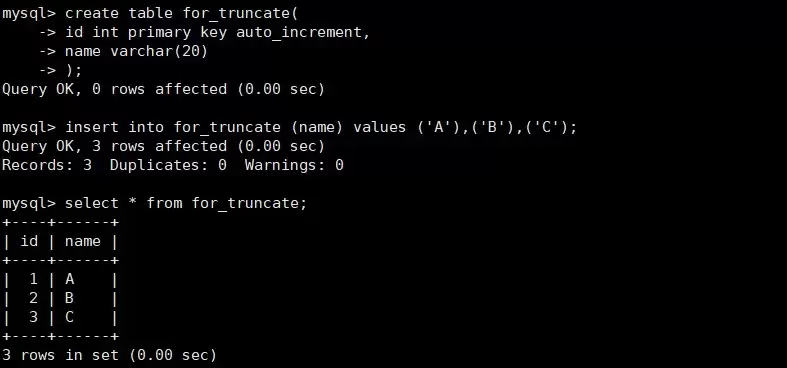
截断整表数据:
truncate for_truncate;
查看删除结果:
select * from for_truncate;

再插入一条数据:
insert into for_truncate (name) values ('D');
查表:
select * from for_truncate;

查看表结构:
show create table for_truncate\G;
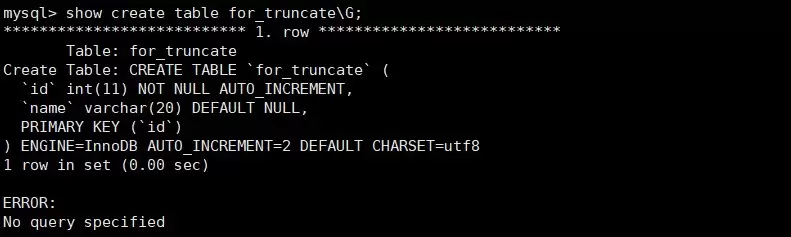
特点:
- 只能清空整张表,不能通过
where删除部分数据。 - 保留表结构,只清空数据,不会删除表的字段、约束和索引等结构。
- 执行速度较快,
truncate通常不会像delete一样逐行删除数据,因此清空大表时速度更快。 - 重置自增长值,执行后,
auto_increment计数器通常会重新开始。
5.聚合函数
5.1.函数
| 函数 | 说明 |
| count(expr) | 返回查询到的数据的 数量 |
| sum(expr) | 返回查询到的数据的 总和,不是数字没有意义 |
| avg(expr) | 返回查询到的数据的 平均值,不是数字没有意义 |
| max(expr) | 返回查询到的数据的 最大值,不是数字没有意义 |
| min(expr) | 返回查询到的数据的 最小值,不是数字没有意义 |
5.2.案例
<1>.统计班级共有多少同学
使用 * 做统计,不受 NULL 影响:
select count(*) from exam_result;

<2>.统计班级收集的 qq 号有多少
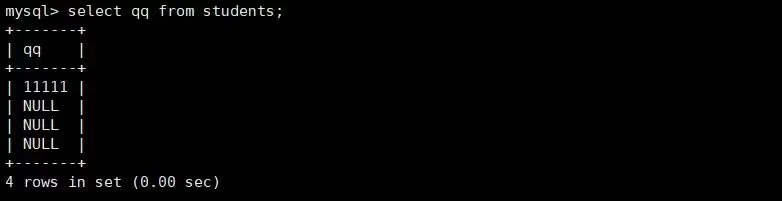
注意:null 不会计入结果
select count(qq) from students;

<3>.统计本次考试的数学成绩分数个数
使用 count 统计全部成绩:
select count(math) from exam_result;

count(distinct math) 统计的是去重成绩数量:
select count(distinct math) from exam_result;

<4>.统计数学成绩总分
select sum(math) from exam_result;

加上一个分数 < 60 的条件:
select sum(math) from exam_result where math<60;

<5>.统计平均总分
select avg(math+chinese+english) from exam_result;

<6>.返回英语最高分
select max(english) from exam_result;

<7>.返回 > 70 分以上的数学最低分
select min(math) from exam_result where math>70;

5.3.group by
语法:
select column1, column2, .. from table group by column;
案例:
先创建表:
-- 创建dept部门表create table dept ( deptno int primary key, dname varchar(20), loc varchar(20));-- 创建salgrade工资等级表create table salgrade( grade int primary key, losal decimal(7, 2), hisal decimal(7, 2));-- 创建emp员工表create table emp( empno int primary key, ename varchar(20), job varchar(20), mgr int, hiredate date, sal decimal(7, 2), comm decimal(7, 2), deptno int, constraint fk_emp_dept foreign key (deptno) references dept(deptno));
然后再插入数据:
//向dept部门表插入数据insert into dept (deptno, dname, loc) values(10, 'accounting', 'new york'),(20, 'research', 'dallas'),(30, 'sales', 'chicago'),(40, 'operations', 'boston');//向salgrade工资等级表插入数据insert into salgrade (grade, losal, hisal) values(1, 700, 1200),(2, 1201, 1400),(3, 1401, 2000),(4, 2001, 3000),(5, 3001, 9999);//向emp员工表插入数据insert into emp (empno, ename, job, mgr, hiredate, sal, comm, deptno) values(7369, 'smith', 'clerk', 7902, '1980-12-17', 800, null, 20),(7499, 'allen', 'salesman', 7698, '1981-02-20', 1600, 300, 30),(7521, 'ward', 'salesman', 7698, '1981-02-22', 1250, 500, 30),(7566, 'jones', 'manager', 7839, '1981-04-02', 2975, null, 20),(7654, 'martin', 'salesman', 7698, '1981-09-28', 1250, 1400, 30),(7698, 'blake', 'manager', 7839, '1981-05-01', 2850, null, 30),(7782, 'clark', 'manager', 7839, '1981-06-09', 2450, null, 10),(7788, 'scott', 'analyst', 7566, '1987-04-19', 3000, null, 20),(7839, 'king', 'president', null, '1981-11-17', 5000, null, 10),(7844, 'turner', 'salesman', 7698, '1981-09-08', 1500, 0, 30),(7876, 'adams', 'clerk', 7788, '1987-05-23', 1100, null, 20),(7900, 'james', 'clerk', 7698, '1981-12-03', 950, null, 30),(7902, 'ford', 'analyst', 7566, '1981-12-03', 3000, null, 20),(7934, 'miller', 'clerk', 7782, '1982-01-23', 1300, null, 10);
<1>.显示每个部门的平均工资和最高工资
select deptno,avg(sal) as 平均工资,max(sal) as 最高工资 from emp group by deptno;
执行结果:
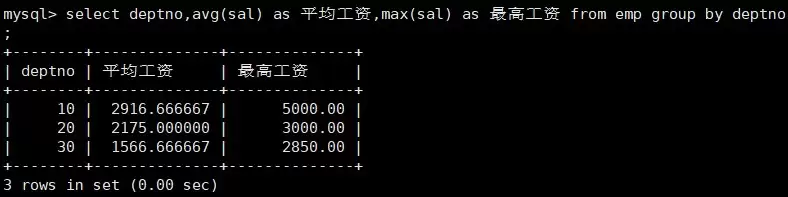
这里按照 deptno 分组,然后分别计算每个部门的平均工资和最高工资。
<2>. 显示每个部门中每种岗位的平均工资和最低工资
select deptno,job,avg(sal) as 平均工资,min(sal) as 最低工资 from emp group by deptno, job;
这里按照两个字段进行分组:group by deptno, job。只有部门编号和岗位都相同的员工,才会被划分到同一组。
执行结果:

<3>. 统计各个部门的平均工资
select deptno,avg(sal) as 平均工资 from emp group by deptno;
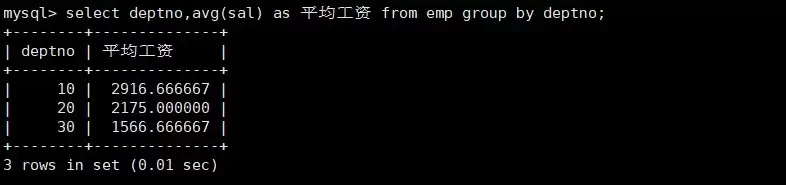
此时只进行分组统计,还没有对分组结果进行筛选。
<4>. 显示平均工资低于2000的部门及其平均工资
需要使用 having 对 group by 产生的分组结果进行过滤:
select deptno,avg(sal) as 平均工资 from emp group by deptno having 平均工资 < 2000;
也可以不使用别名:
select deptno,avg(sal) as 平均工资 from emp group by deptno having avg(sal) < 2000;
执行结果:
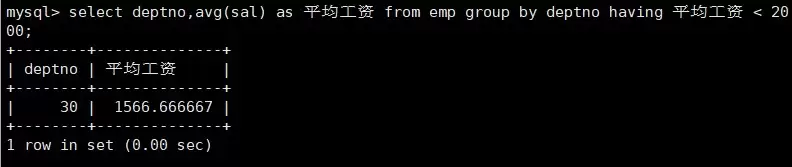
如果尝试使用 where 会怎样?
select deptno,avg(sal) as 平均工资 from emp group by deptno where avg(sal) < 2000;

报错原因:where 必须写在 group by 之前,SQL 一般书写顺序是:select → from → where → group by → having → order by。
那如果这样写呢?
select deptno,avg(sal) as 平均工资 from emp where avg(sal)<2000 group by deptno;

报错原因:where 不能筛选聚合结果。avg(sal) 是分组后才计算出来的平均工资,而 where 在分组前执行,所以 where 不能使用 avg() 等聚合函数。
having 的执行顺序:
from emp ↓group by deptno ↓计算avg(sal),产生平均工资 ↓having 平均工资 < 2000 ↓select返回结果
where 的执行顺序:
from emp ↓where sal < 2000筛选出工资低于2000的员工 ↓group by deptno按照部门编号进行分组 ↓计算每个部门的avg(sal) ↓select deptno, avg(sal) as 平均工资 ↓返回查询结果
总结一下:本篇介绍了 MySQL 中数据的增删改查操作,并学习了 where、order by 和 limit 等常用查询子句。通过聚合函数、group by 和 having,可以进一步完成数据统计、分组以及分组结果筛选。掌握这些基础语法和执行顺序后,就能根据实际需求组合出较为完整的数据查询语句了。

游乐网为非赢利性网站,所展示的游戏/软件/文章内容均来自于互联网或第三方用户上传分享,版权归原作者所有,本站不承担相应法律责任。如您发现有涉嫌抄袭侵权的内容,请联系youleyoucom@outlook.com。
 同类文章
同类文章

Redis是什么:核心特性、架构与应用场景解析
Redis是一款基于内存的键值型NoSQL数据库,以超高读写速度和丰富的数据结构著称。本文系统梳理Redis的核心特性、架构组成、性能优势及典型应用场景,并通过与Memcached、MySQL、MongoDB的对比,帮助开发者快速判断Redis是否适合当前业务需求。

Windows 安装 MongoDB 完整图文教程
本文详细介绍在 Windows 系统上安装 MongoDB 的完整流程。从官网下载 MSI 安装包开始,逐步演示自定义安装路径、配置 Windows 服务、跳过 MongoDB Compass 等关键选项,并提供通过系统服务列表验证安装是否成功的方法,帮助开发者快速搭建本地 MongoDB 环境。

Linux 安装 MongoDB 完整指南:依赖配置、环境变量与服务启动
本文详解在 Linux 系统下安装 MongoDB 的完整流程,涵盖依赖包安装、二进制包下载解压、环境变量配置、数据与日志目录创建及服务启动验证。通过标准化命令与路径说明,帮助开发者快速完成部署并确认服务状态。

MacOS安装MongoDB完整教程
本文介绍在MacOS系统下安装MongoDB的完整流程,涵盖下载、解压、目录配置、环境变量设置及服务启动。通过明确的命令与参数说明,帮助开发者快速完成环境搭建并验证安装结果。

Ubuntu系统安装与配置Redis完整指南
本文详解在Ubuntu系统中安装Redis的两种主流方式:apt在线安装与源码编译安装。涵盖版本选择逻辑、服务启停与状态检查、连接验证方法,以及在线练习工具与桌面GUI客户端的对比与使用建议,帮助开发者快速搭建并验证Redis运行环境。


- 热门数据榜
 1
1
 2
2
 3
3
 4
5
6
7
8
9
10
相关攻略
4
5
6
7
8
9
10
相关攻略
 2026-09-01 06:20
2026-09-01 06:20
2026-09-01 06:19
2026-09-01 06:19
2026-09-01 06:19
2026-09-01 06:18
2026-09-01 06:18
热门教程
2026-09-01 06:20
2026-09-01 06:20
2026-09-01 06:20
2026-09-01 06:19
2026-09-01 06:19
2026-09-01 06:19
2026-09-01 06:18
2026-09-01 06:18
热门教程
- 游戏攻略
- 安卓教程
- 苹果教程
- 电脑教程